Follow the following steps on how to connect the domain with your system.
STEP 1: Open the domain panel
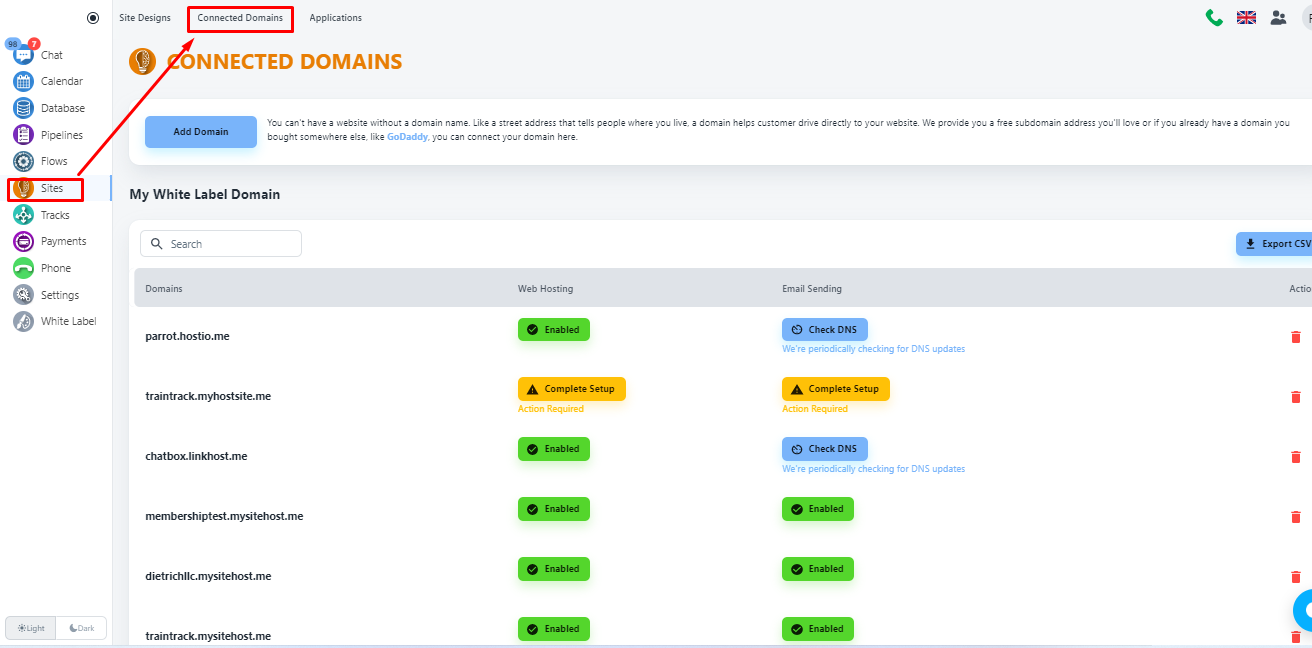
Navigate to the domain panel by clicking the “Sites” on the left side menu. Then when you have that page open you will see a link to “Connected Domains” on the top of your page, please click that.
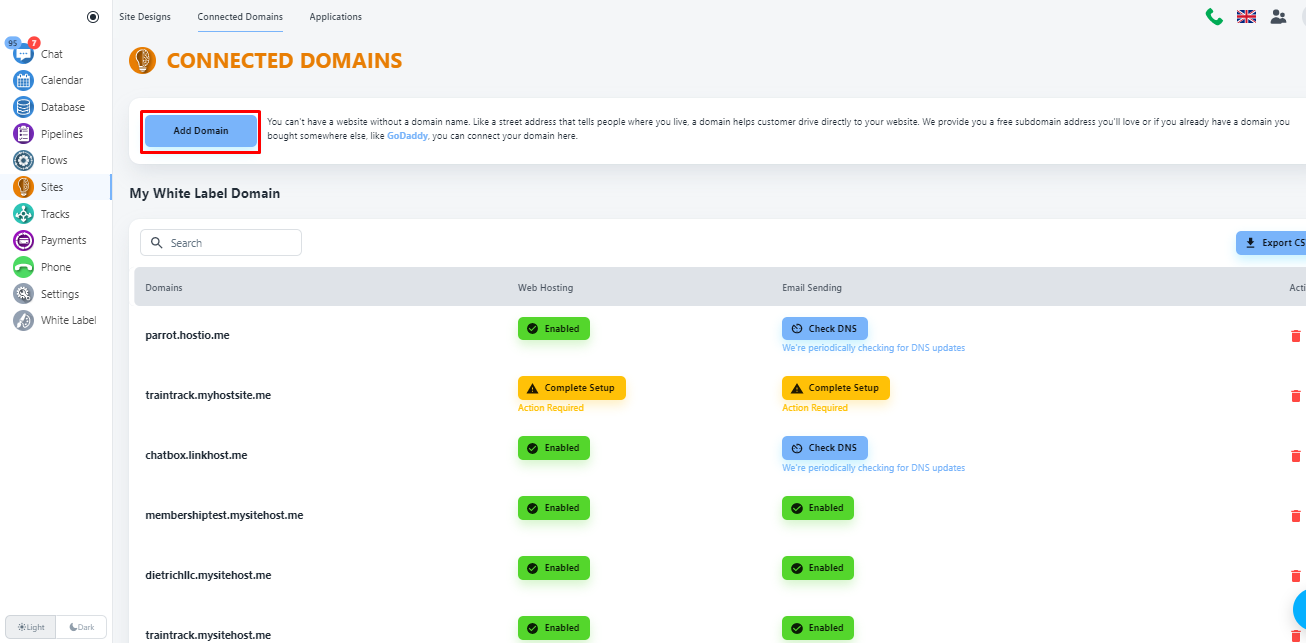
Now, click on the ‘Add Domain’ button to add your domain with System
STEP 2: Select domain type
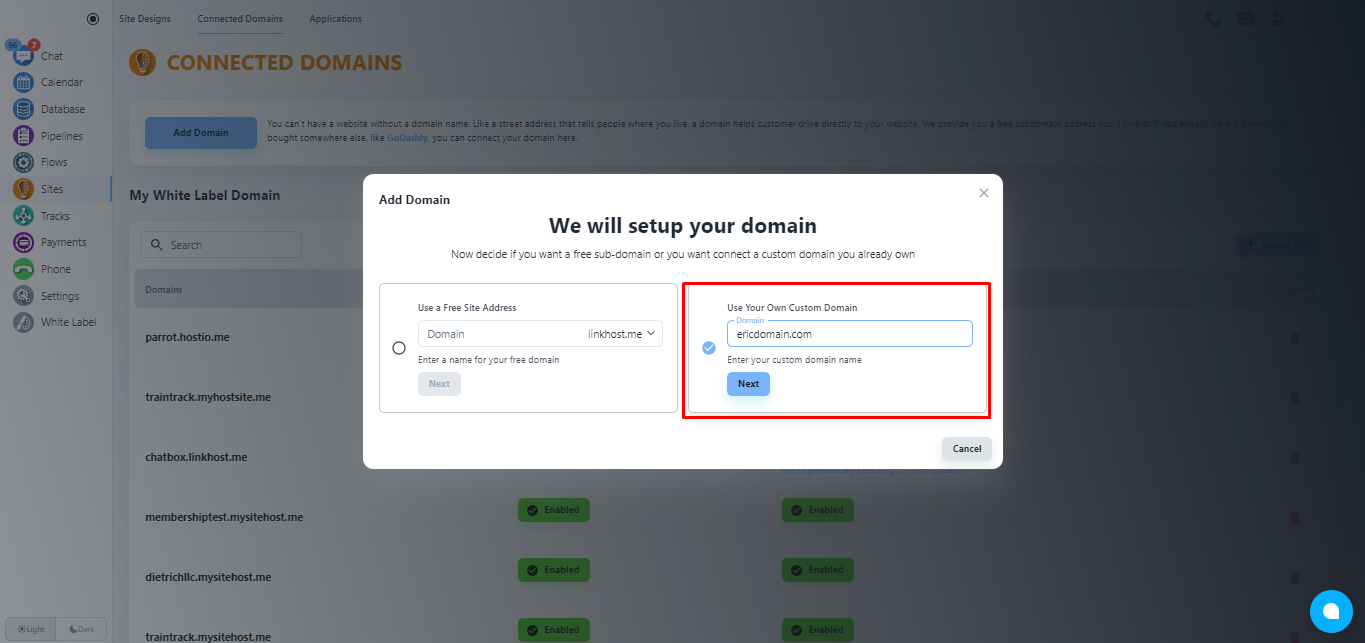
The system will allow you to add a free domain or custom domain. For our case, we will select the second option, and put your domain name.
Click on the ‘Next’ button.
STEP 3: Select services
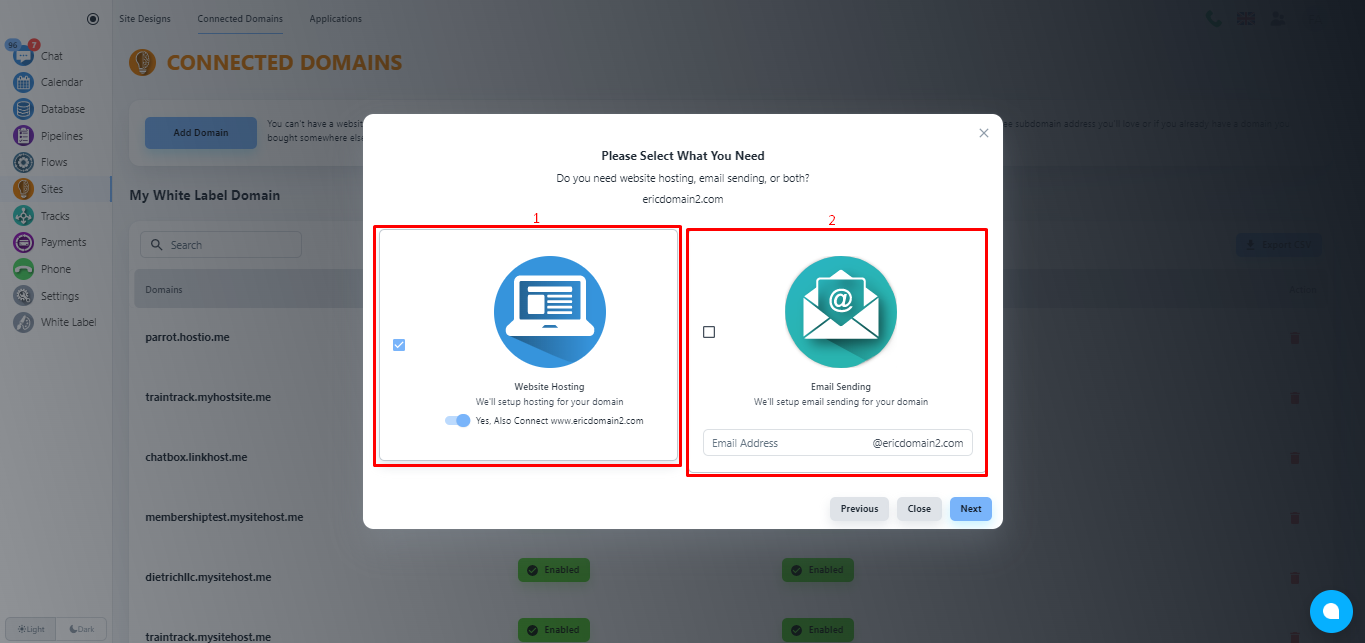
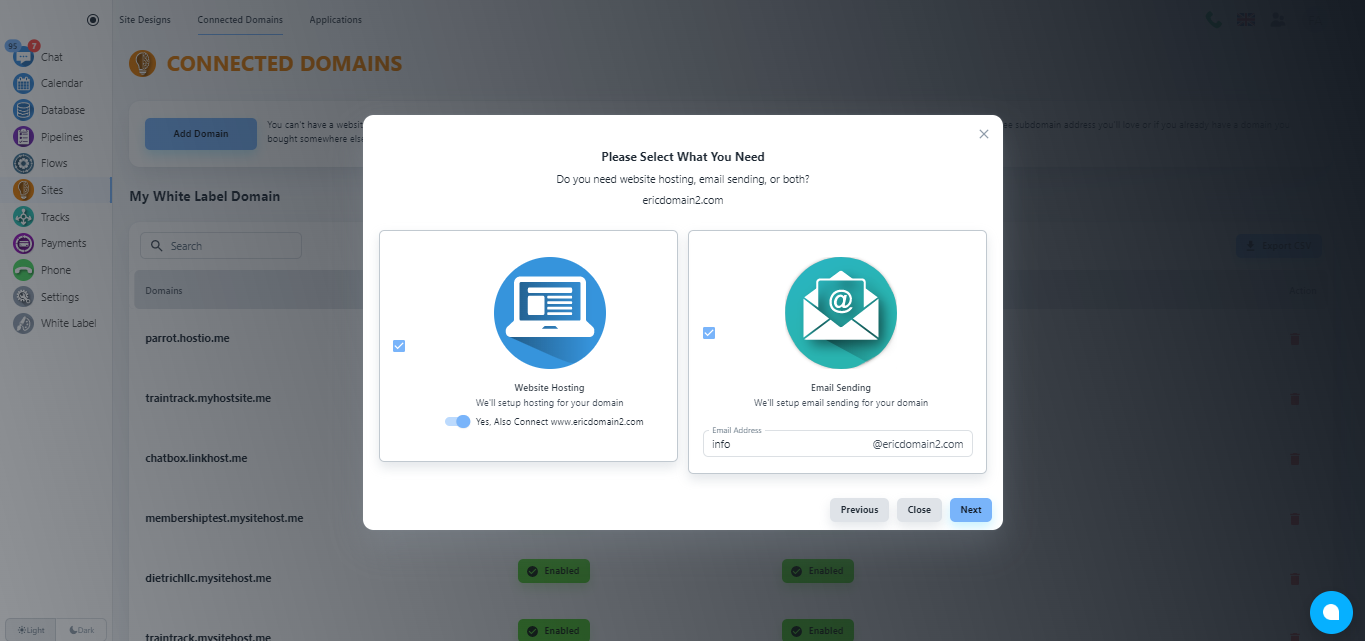
Now, the system will offer you System services. By default, the Website Hosting service will be enabled.
💡 When to use email sending? If you also need the Email service, please, click on the checkbox of the second tab, and add the email address that you want to add with System for email services.
💡 Enabling email services will not hamper your existing email services.
Please, click on the ‘Next’ button.
STEP 4: Choose faster CDN (optional)
Now, the system will offer you the option to choose a faster CDN for a better web service experience for your users. Please, click on the ‘No, Thank You’ button unless you want a faster CDN for $5/month.
STEP 5: Collect DNS records
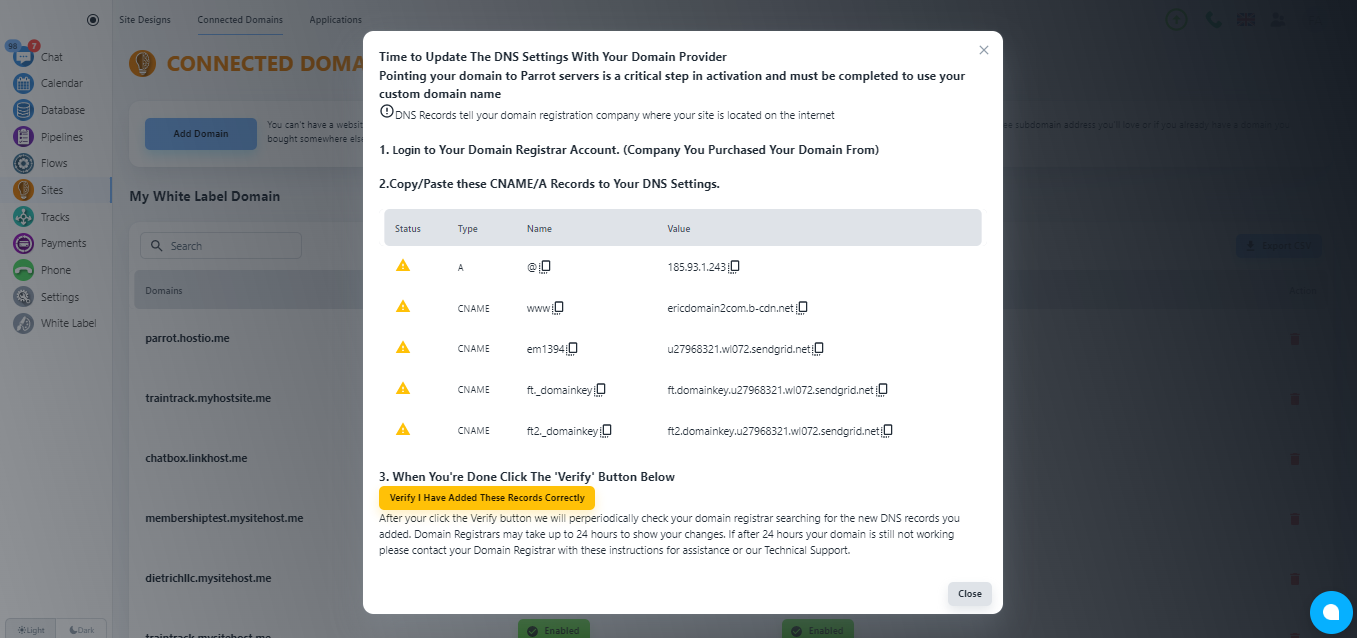
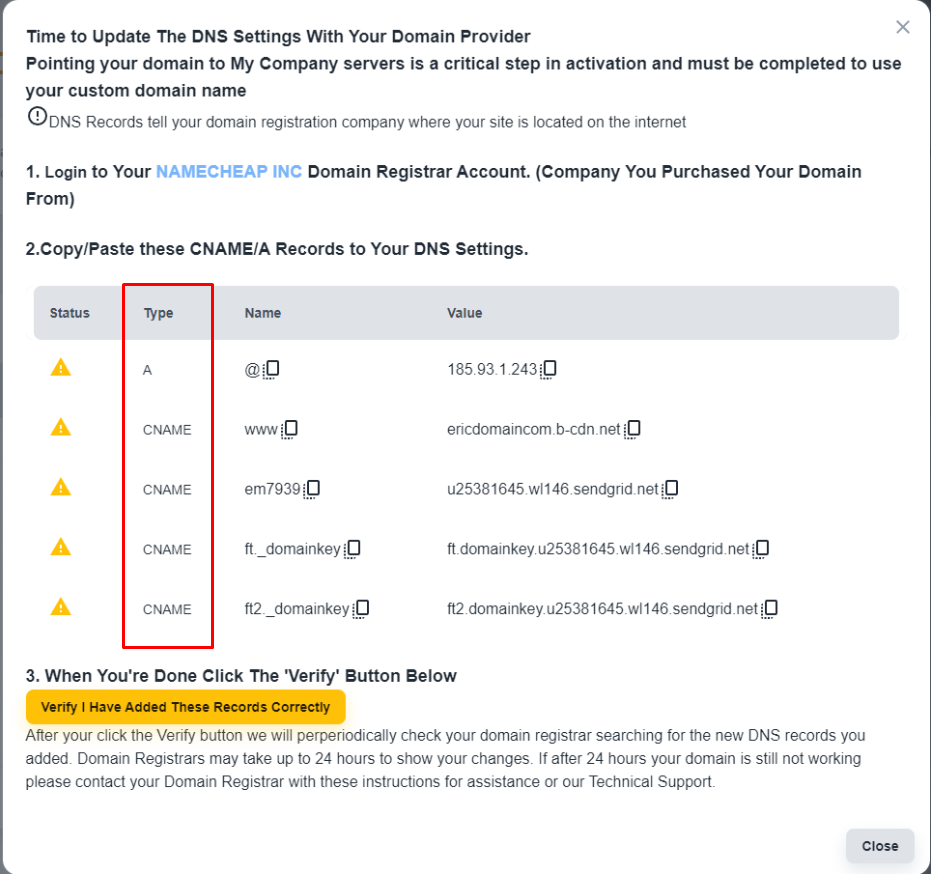
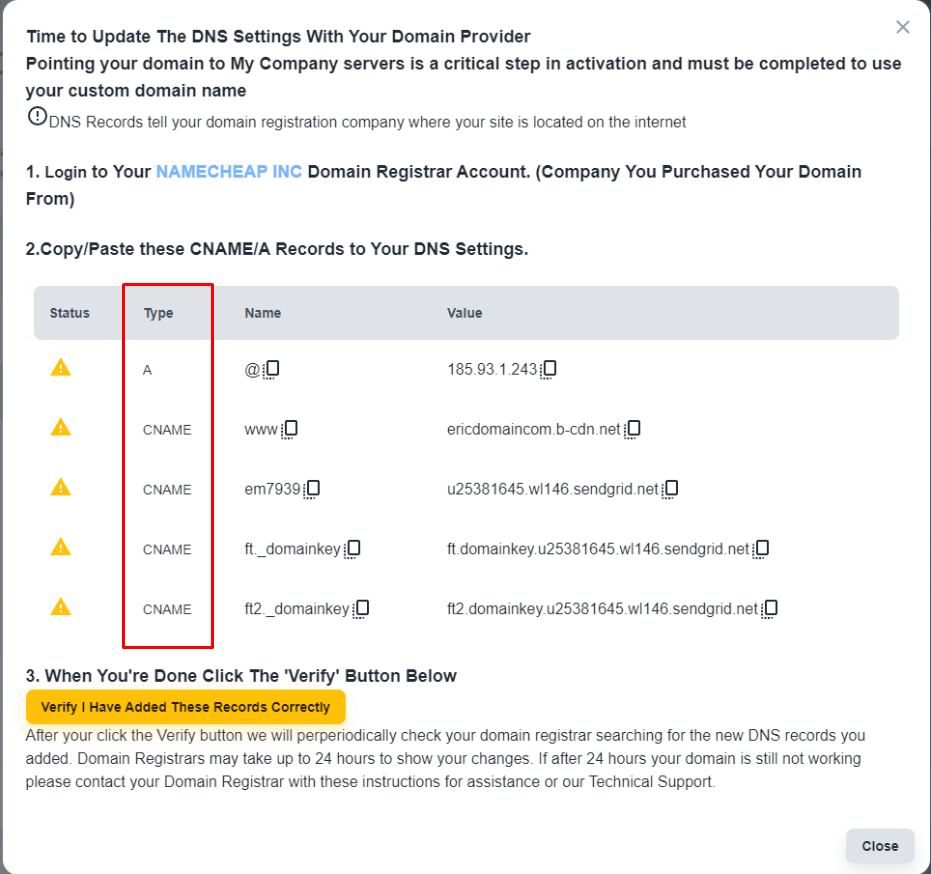
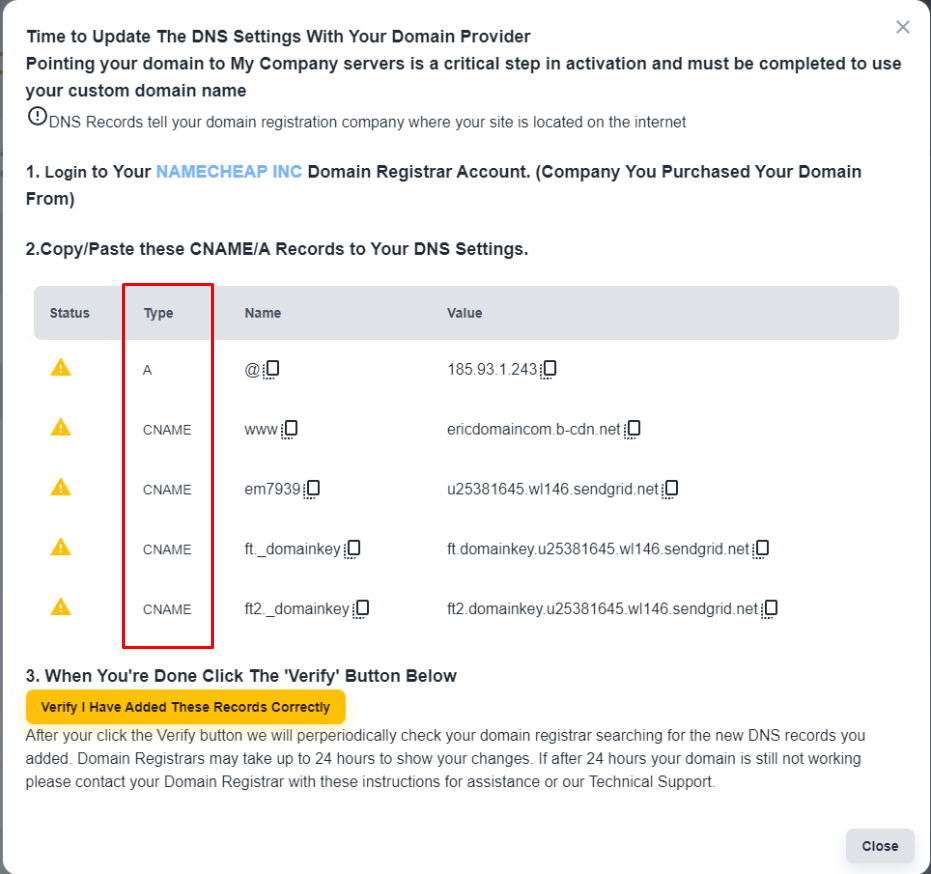
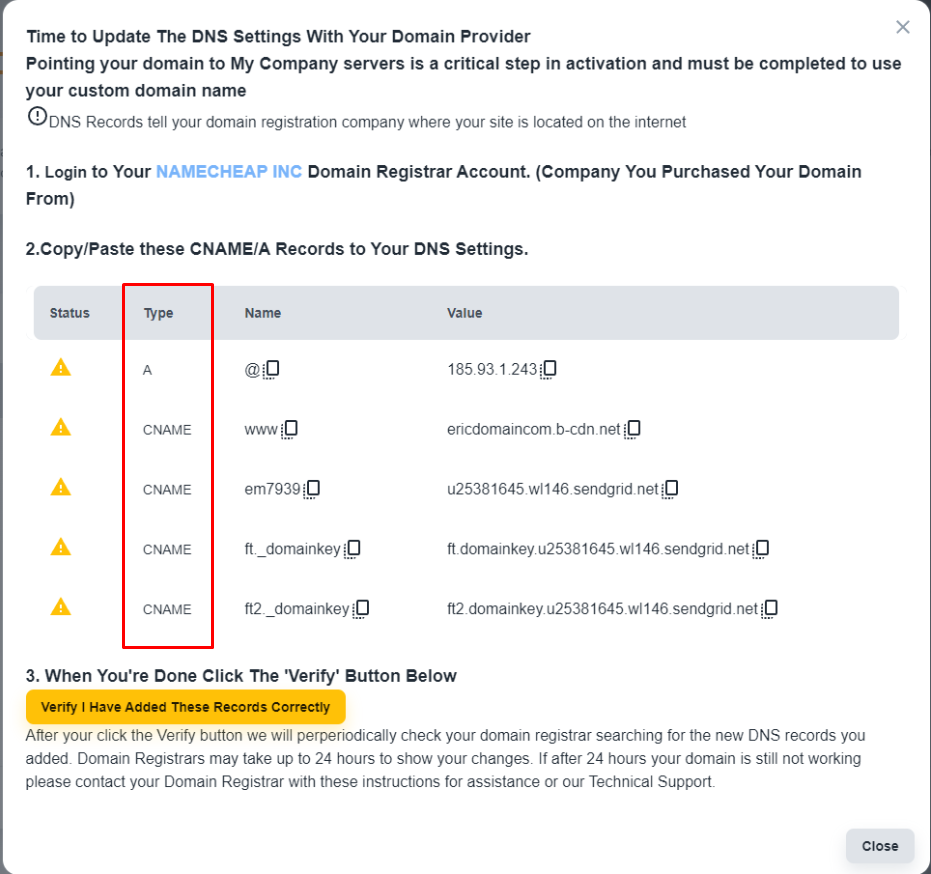
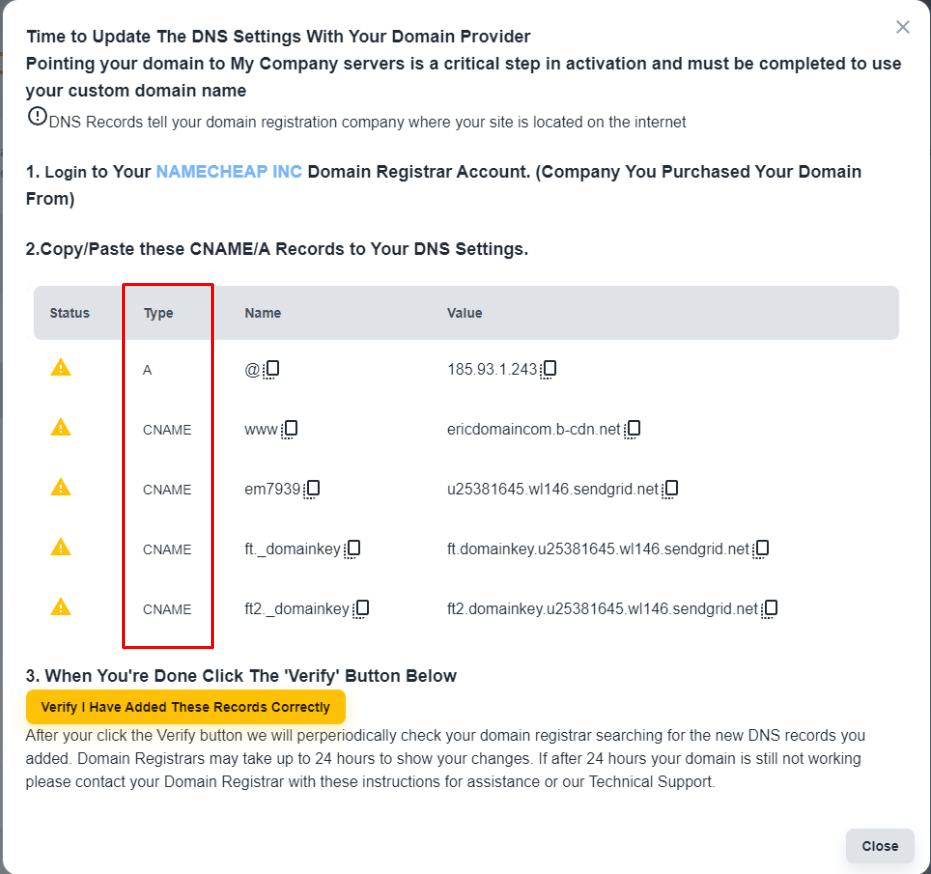
Please, wait for a while, the system will provide you with the required DNS records that you need to add to your SiteGround account.
🌐ADDITIONAL STEPS PER DIFFERENT DOMAIN PROVIDERS🌐
GOOGLE DOMAIN Separating DNS record
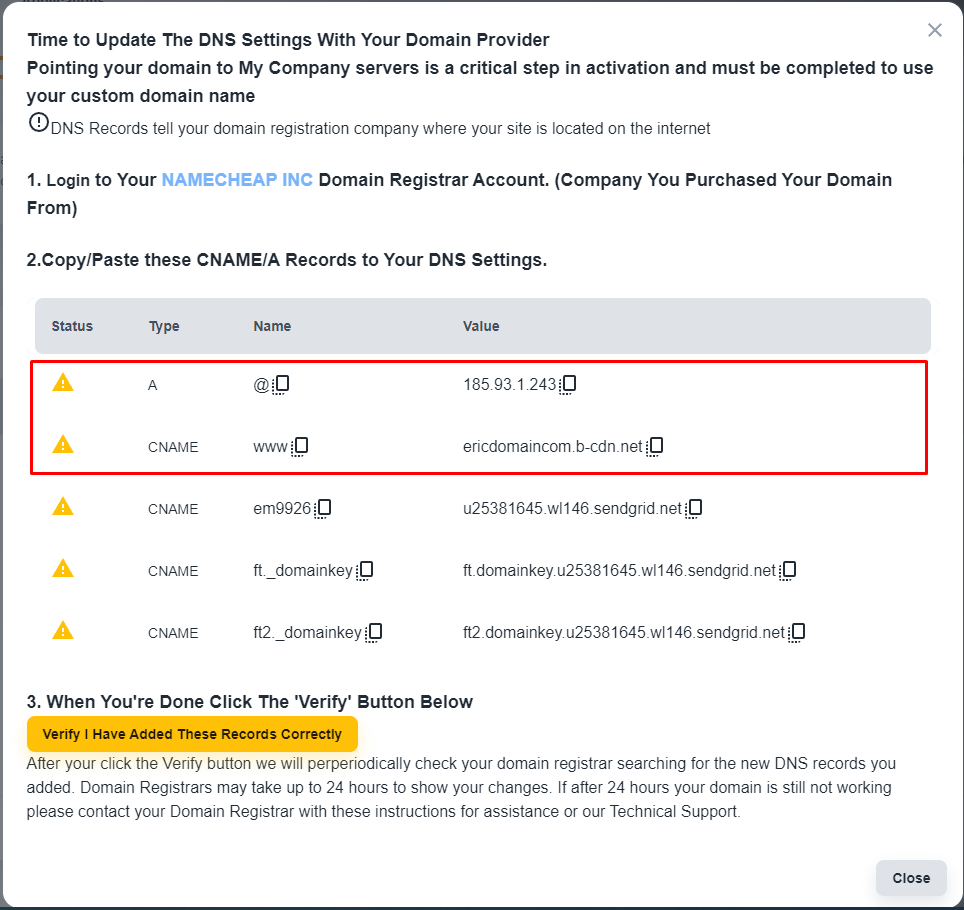
DNS record for Web Hosting
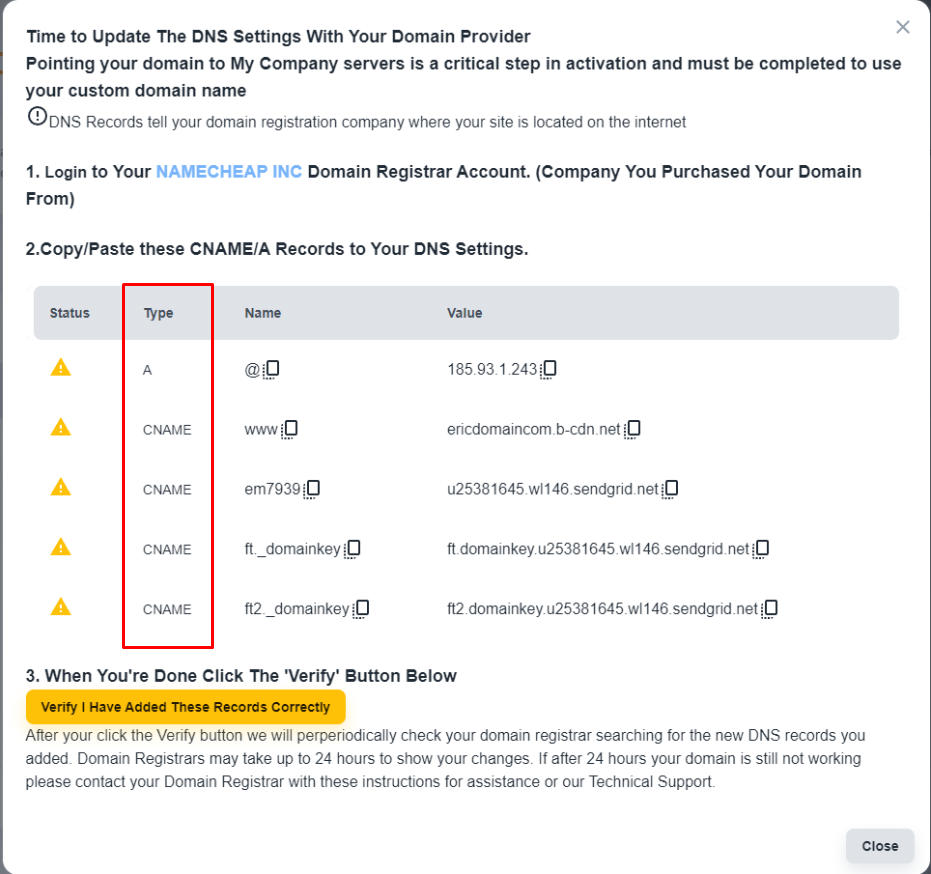
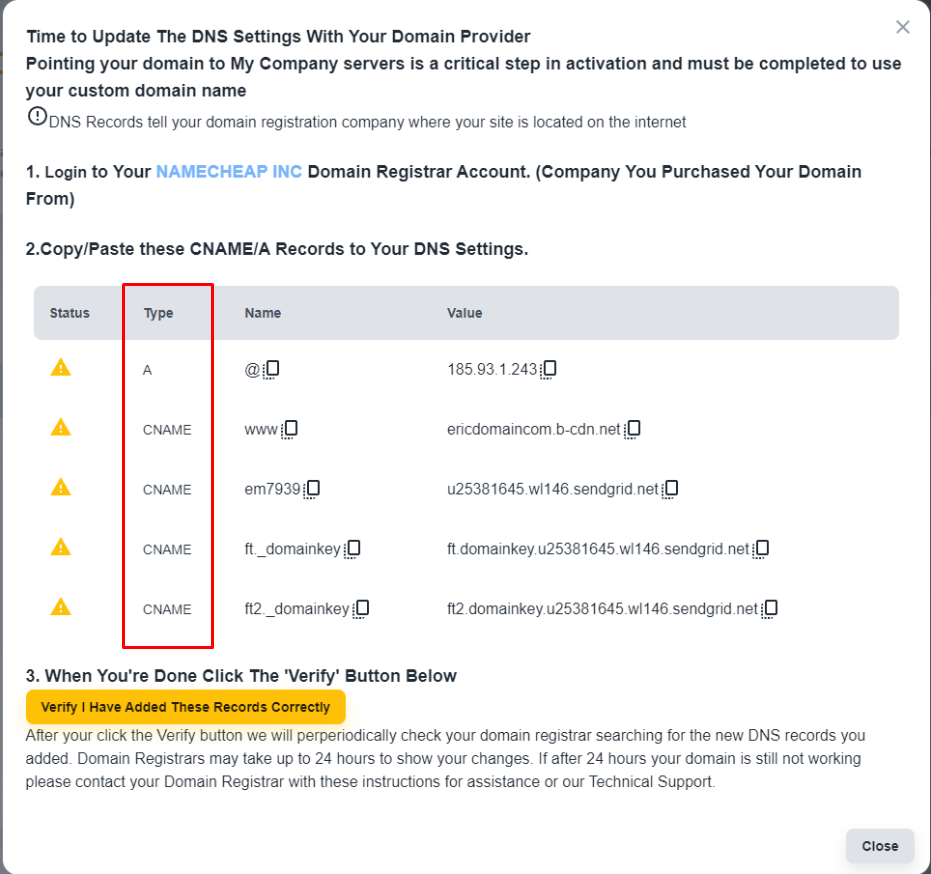
As per the screenshot, the first two records are the DNS record for the web hosting service. Among them, the first one is an ‘A’ type DNS record
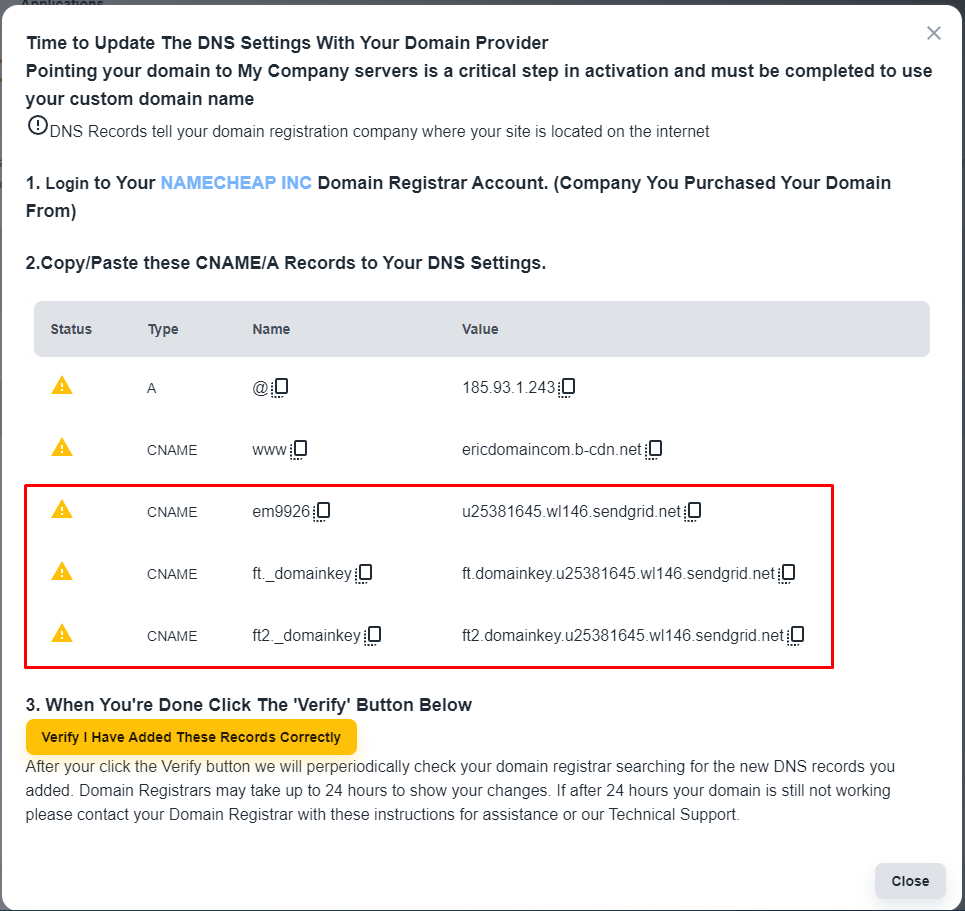
DNS record for Email Service
As per the screenshot, the last three records are related to the email services. All of these records are CNAME records.
💡 If you need only one specific service, then you can ignore DNS records related to other services.
Steps to add DNS record to Google Account
Select domain
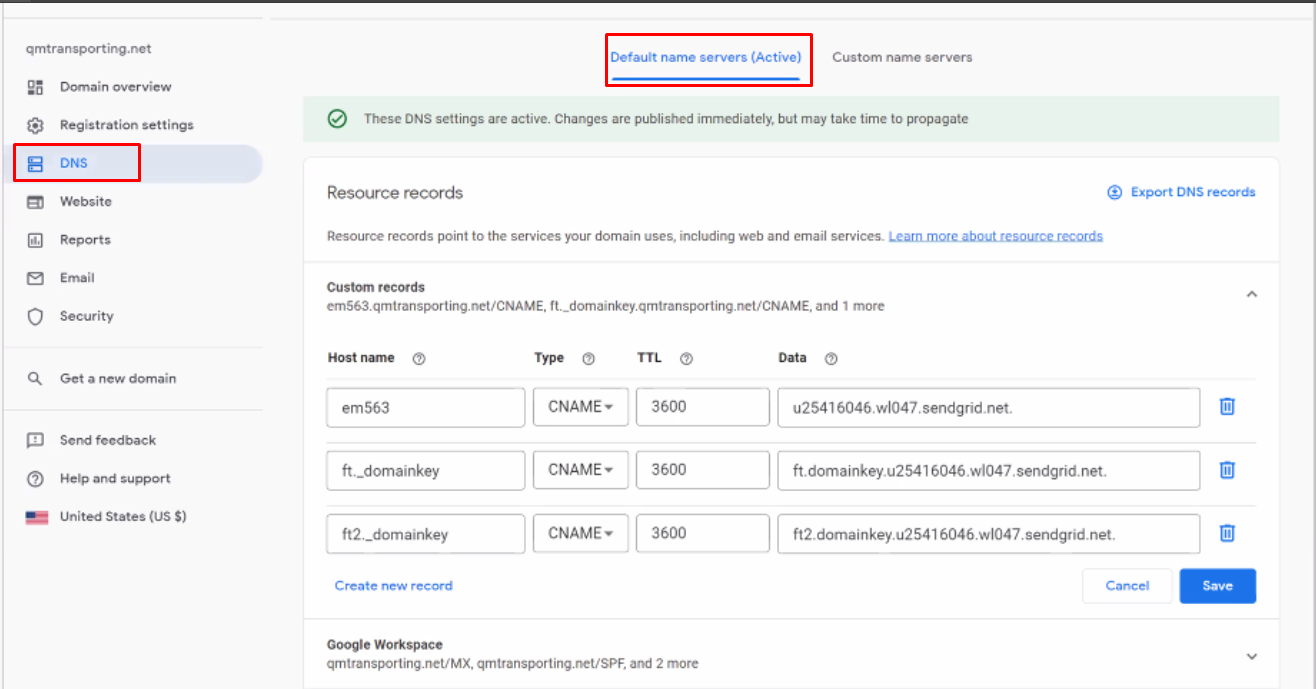
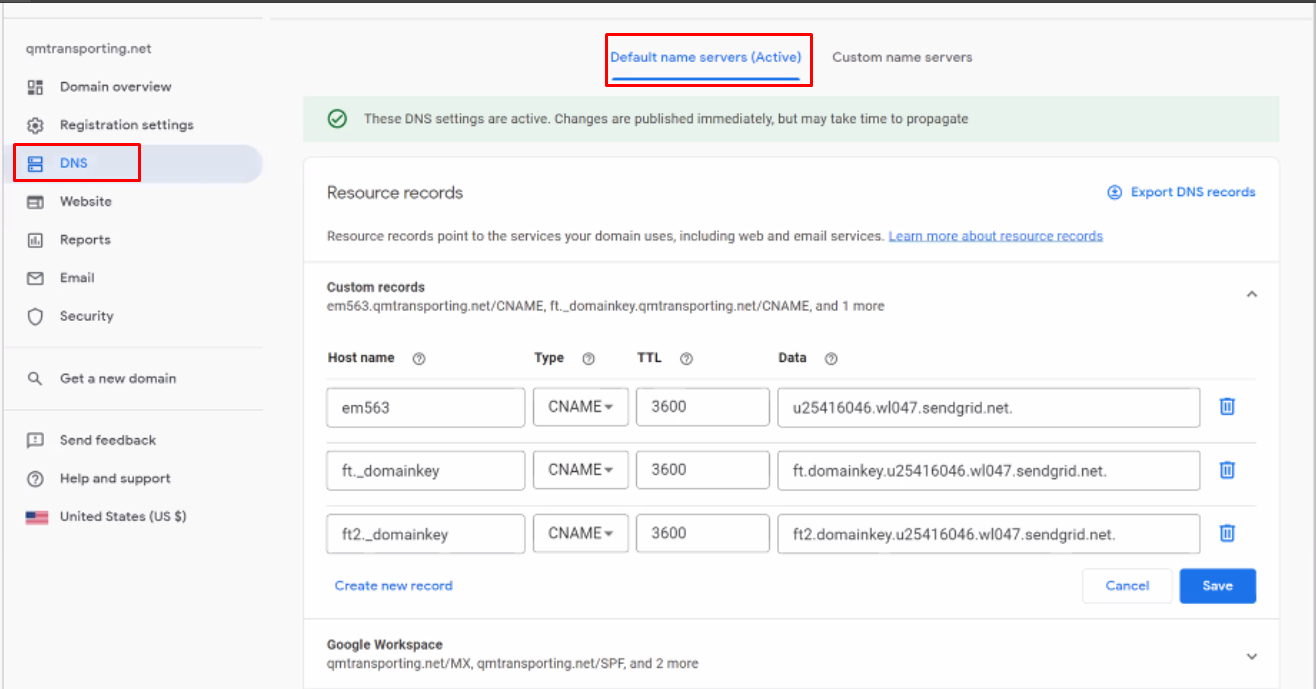
After logging in, please, click on the left 'DNS' button and go to the 'Default name servers (Active)' tab.
Create a record
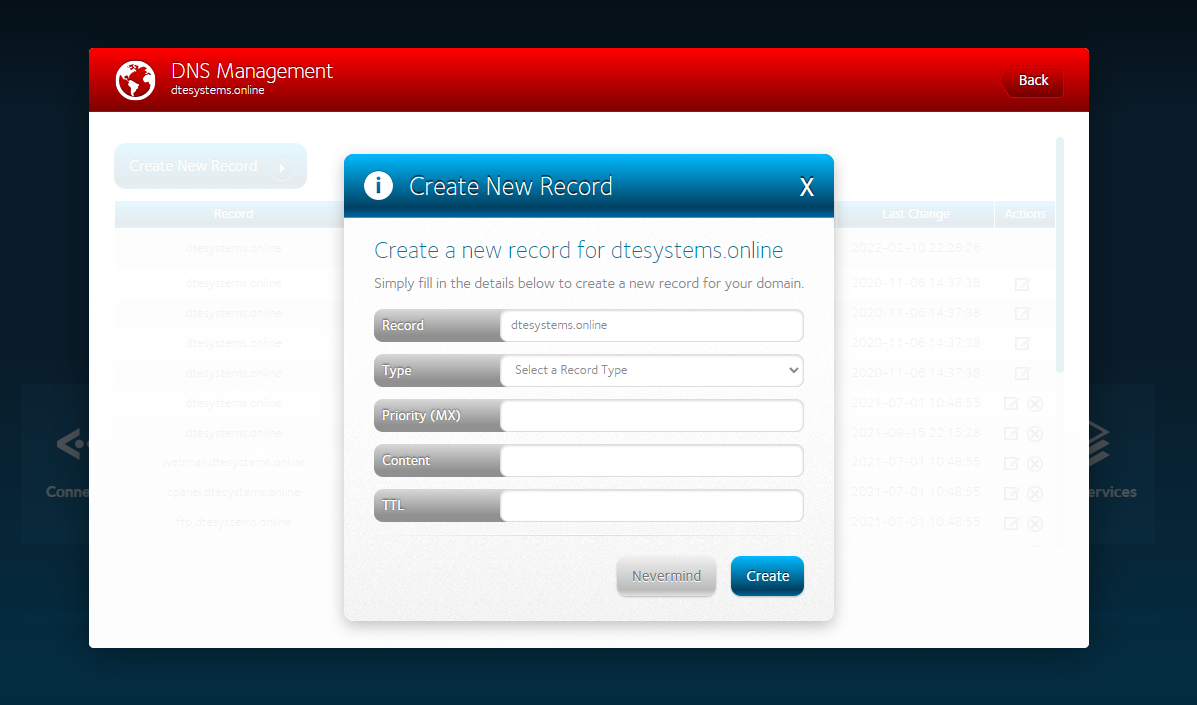
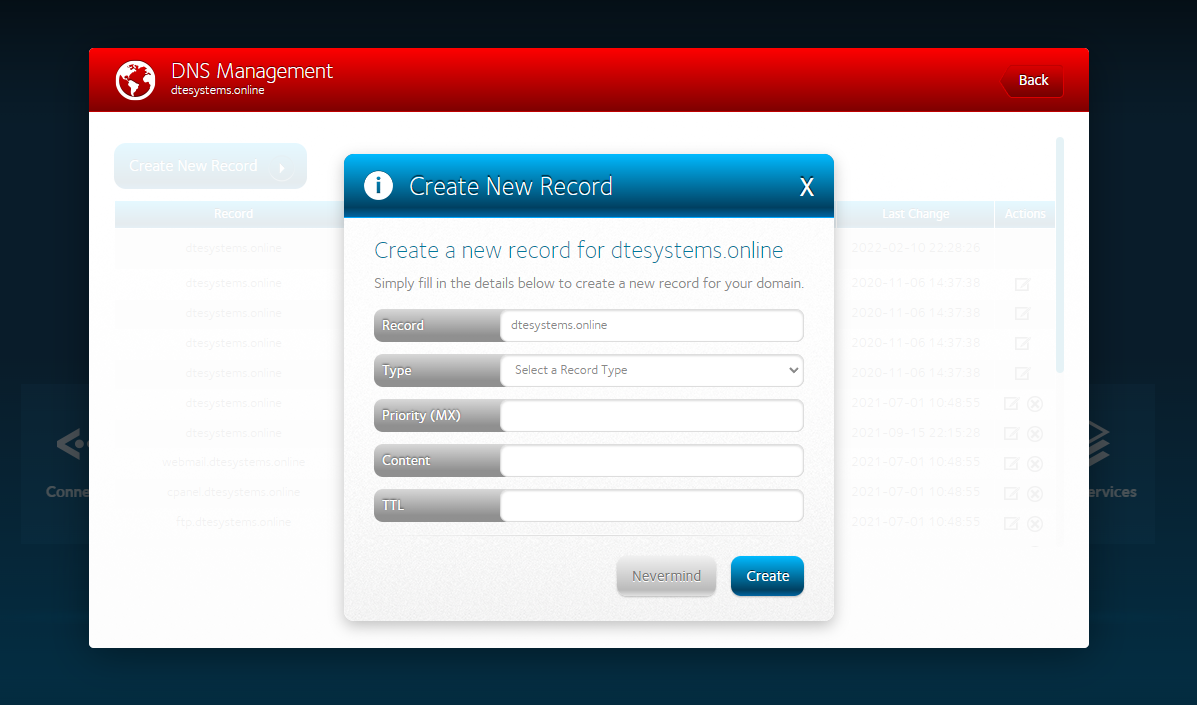
Please, click on the 'Create New Record' button to add the records mentioned above
Select record type
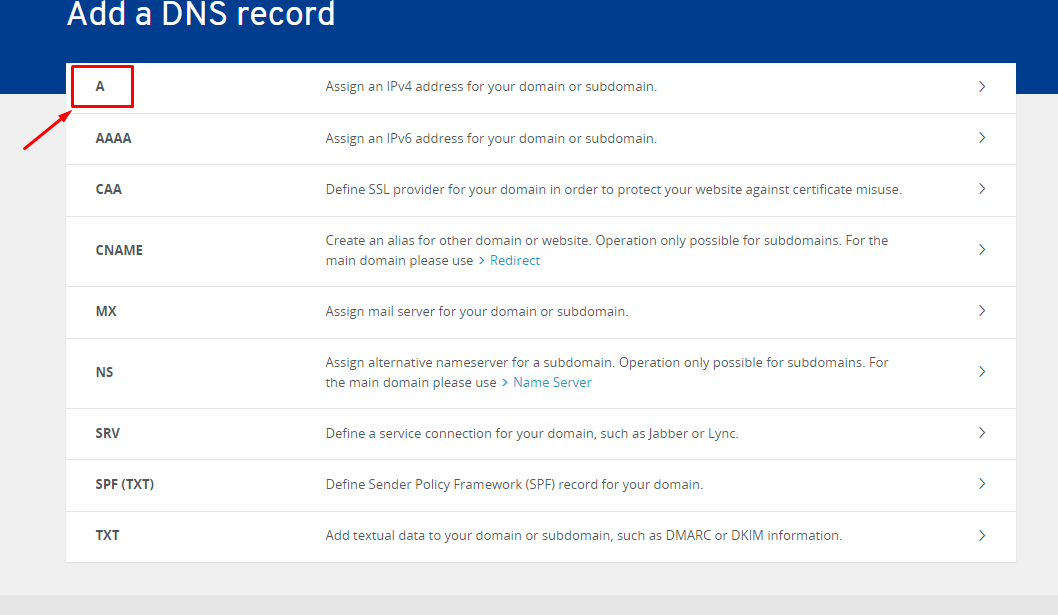
To select the proper type of DNS record, you can define that from System-provided DNS records. Please, check the screenshot
Sample format of DNS record
‘A’ type of record
You will have to add the A record in the following way.
Host name -> (This field will be empty)
Type -> A
TTL -> 3600
Data -> 185.93.1.243
There is no need to change any other default values. Please click on the 'Create' button to save the record.
‘CNAME’ type of record
You will have to add the CNAME records in the following way.
Host name -> em3206
Type -> CNAME
TTL -> 3600
Data -> u22813504.wl005.sendgrid.net
Steps to add DNS record to AFRIHOST Account
Select domain
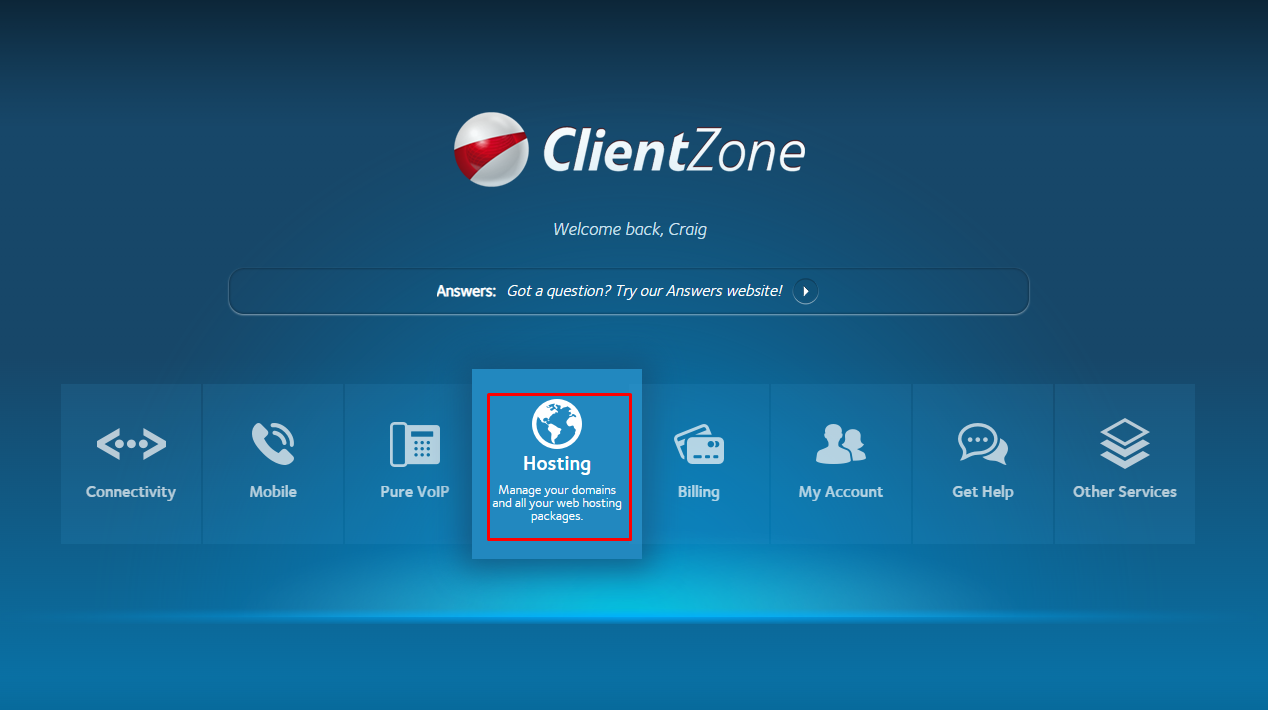
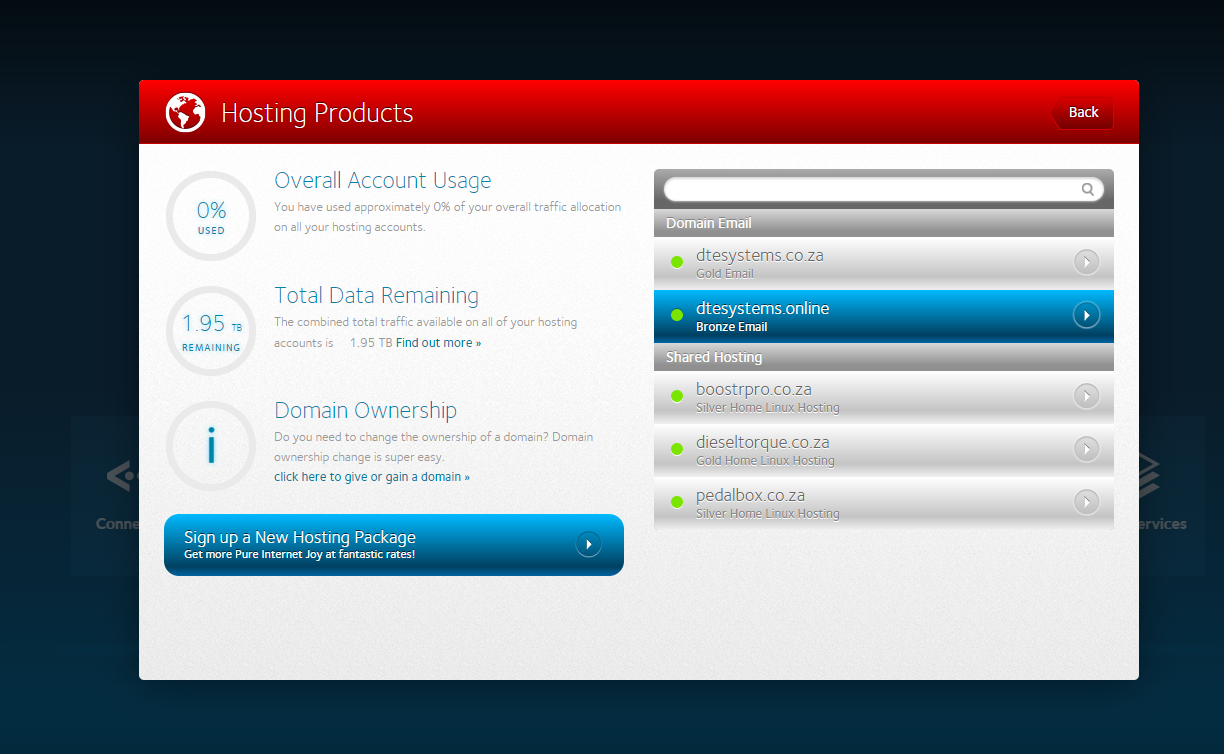
After logging in, please, click on the 'Hosting' button.
Now, select your concerned domain.
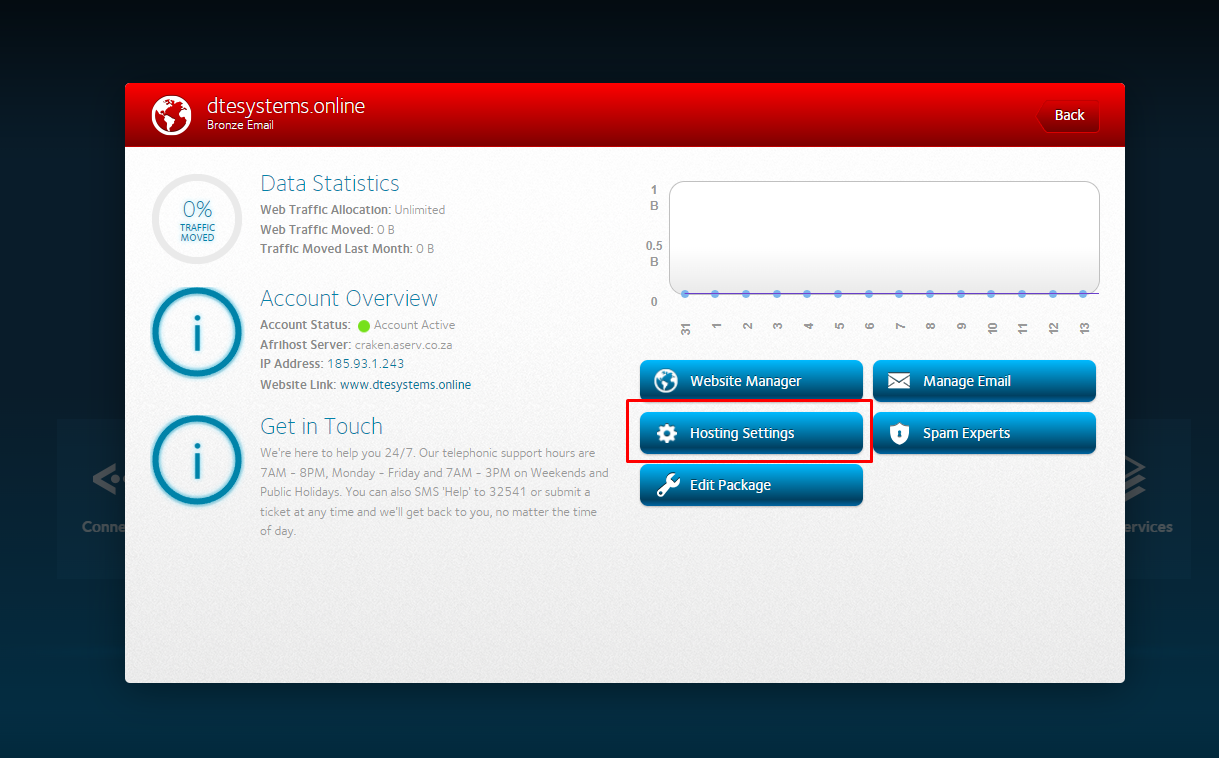
Click on the 'Hosting Settings' button.
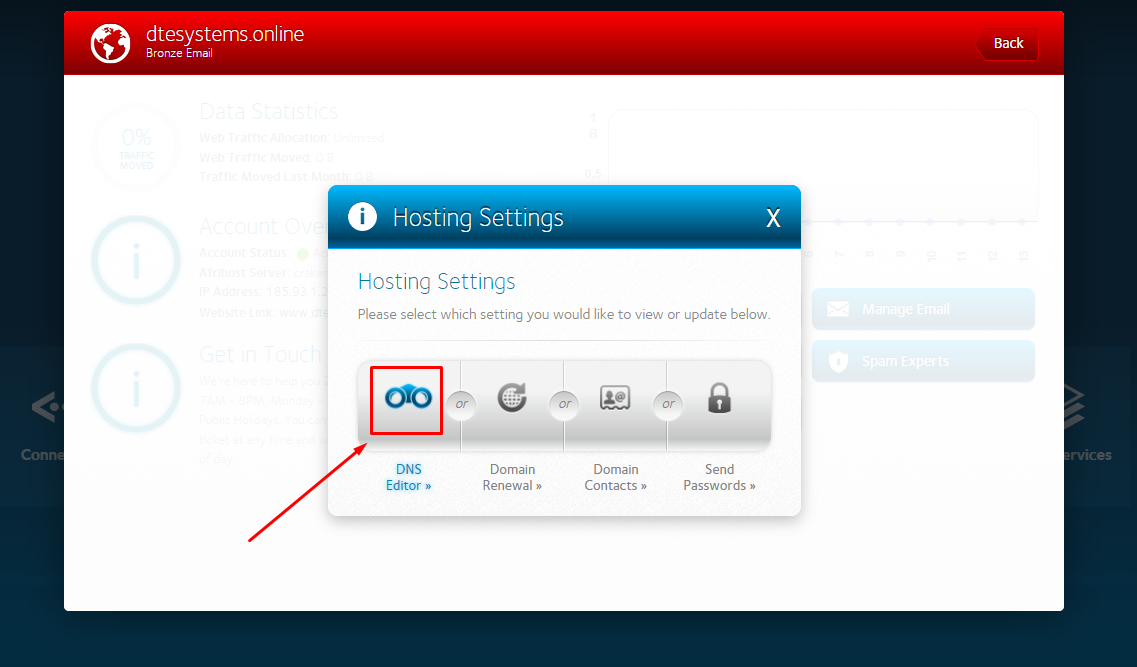
Now, click on the 'DNS Editor’
Add a record
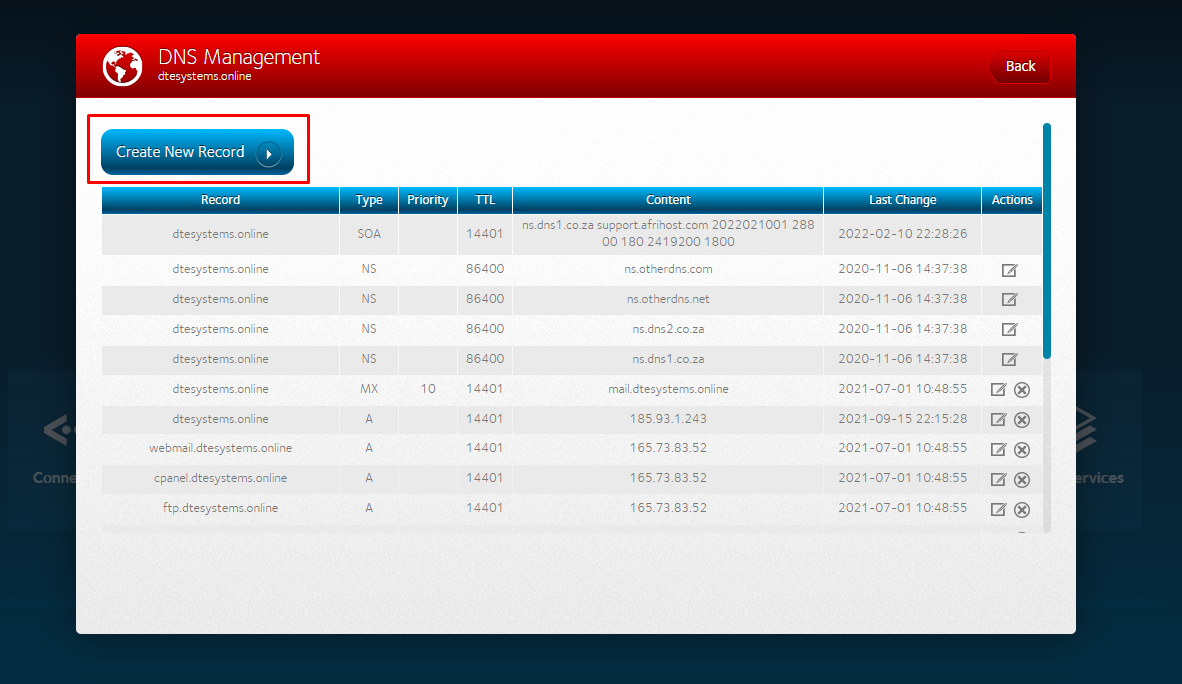
Click on the 'Create New Record' button to add DNS records
Select record type
To select the proper type of DNS record, you can define that from system-provided DNS records. Please, check the screenshot
Sample format of DNS record
‘A’ type of record
For the type dropdown, select 'A' type to add DNS record for web hosting
You will have to input the following values accordingly.
Host name -> @
Points to -> 185.93.1.243
TTL -> 1 hour
There is no need to change any other default values. Please click on the 'Add record' button to save the record.
‘CNAME’ type of record
Now, follow the same process to add the other DNS records for the email service. But time, you will have to select the 'CNAME' option.
You will have to add the CNAME records in the following way.
Host Record -> em3206
Points To-> u22813504.wl005.sendgrid.net
TTL -> 4 hour
Steps to add DNS record to Ionos Account
Select domain
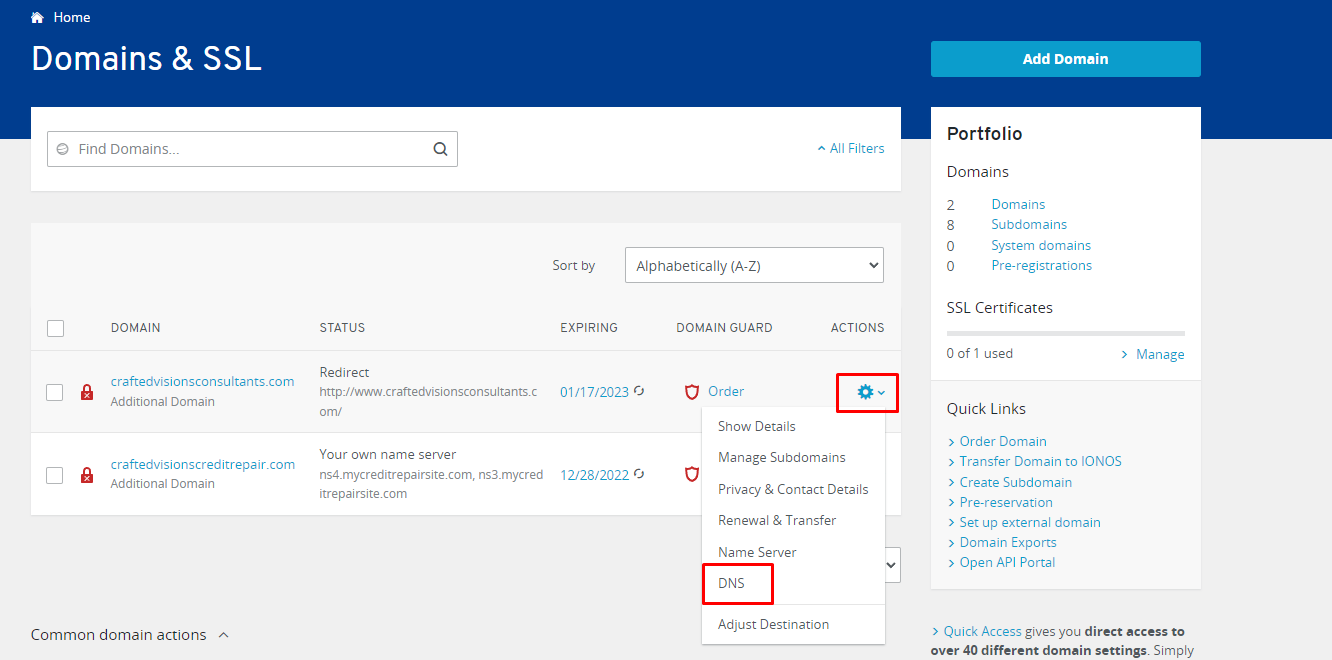
After logging in, please, click on the concerned domain's settings gear icon, and you will get the 'DNS' option there.
Add a record
And click on the 'Add Record' button to add the abovementioned records.
Select record type
To select the proper type of DNS record, you can define that from System-provided DNS records. Please, check the screenshot
Sample format of DNS record
‘A’ type of record
Now, the System will provide you with the option to select the DNS record type. Please, click on the 'A' to add the record for web hosting.
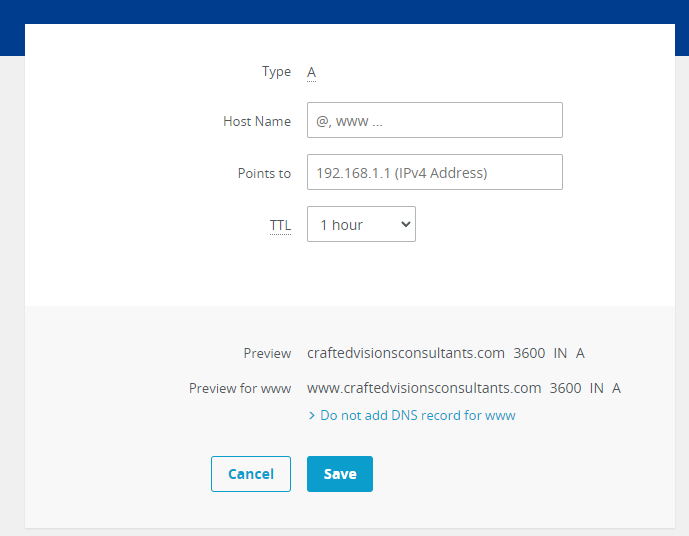
The System will provide you with how to add a DNS record's value.
You will have to input the following values accordingly.
Host name -> @
Points to -> 185.93.1.243
TTL -> 1 hour
There is no need to change any other default values. Please click on the 'Add record' button to save the record.
‘CNAME’ type of record
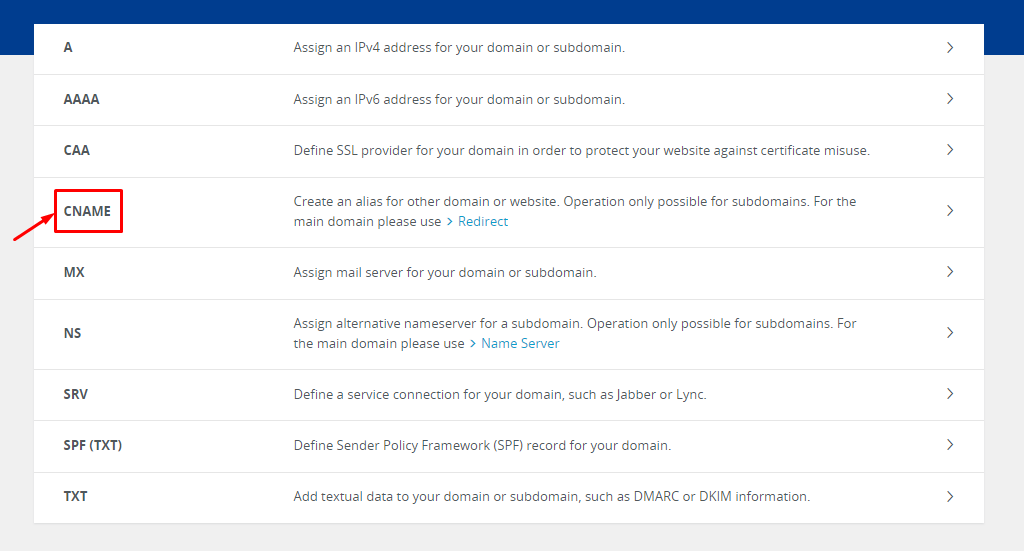
Now, follow the same process to add the other DNS records for the email service. But time, you will have to select the 'CNAME' option.
You will have to add the CNAME records in the following way.
Host Record -> em3206
Points To-> u22813504.wl005.sendgrid.net
TTL -> 4 hour
Steps to add DNS record to BLUEHOST Account
Select domain
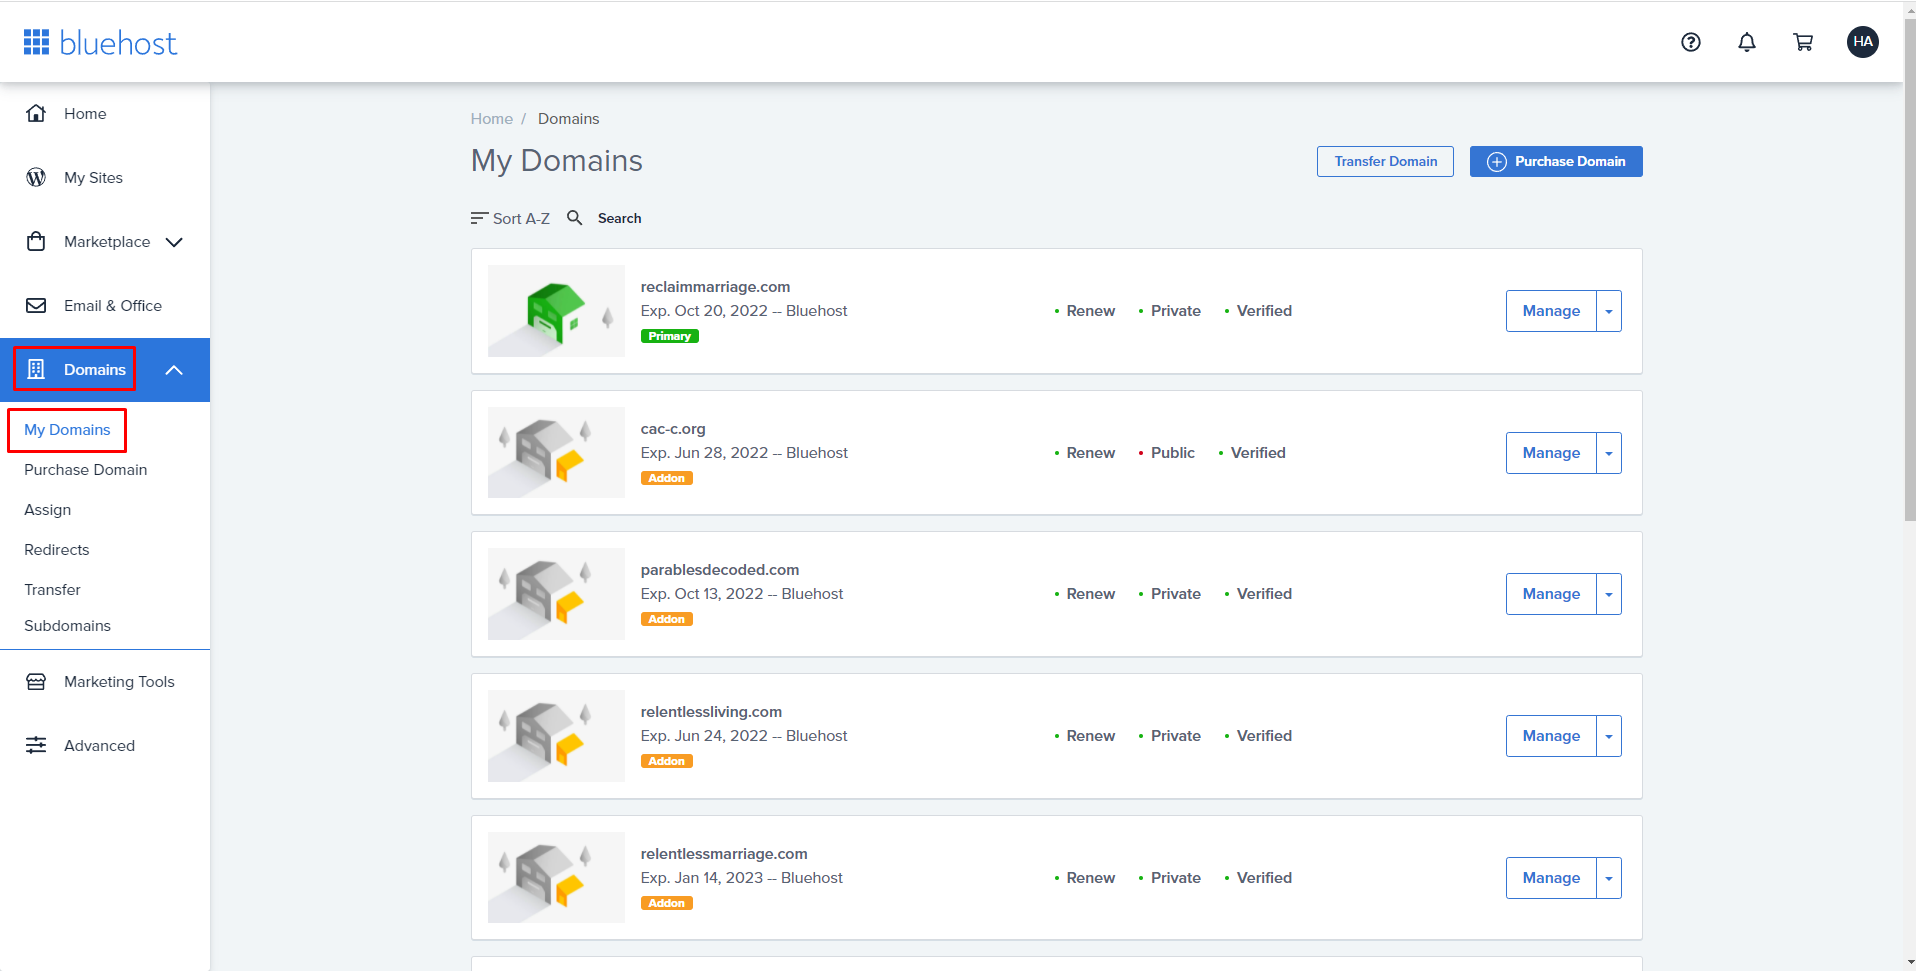
After logging in, please, navigate to the ‘My Domains’ under the ‘Domains’ section.
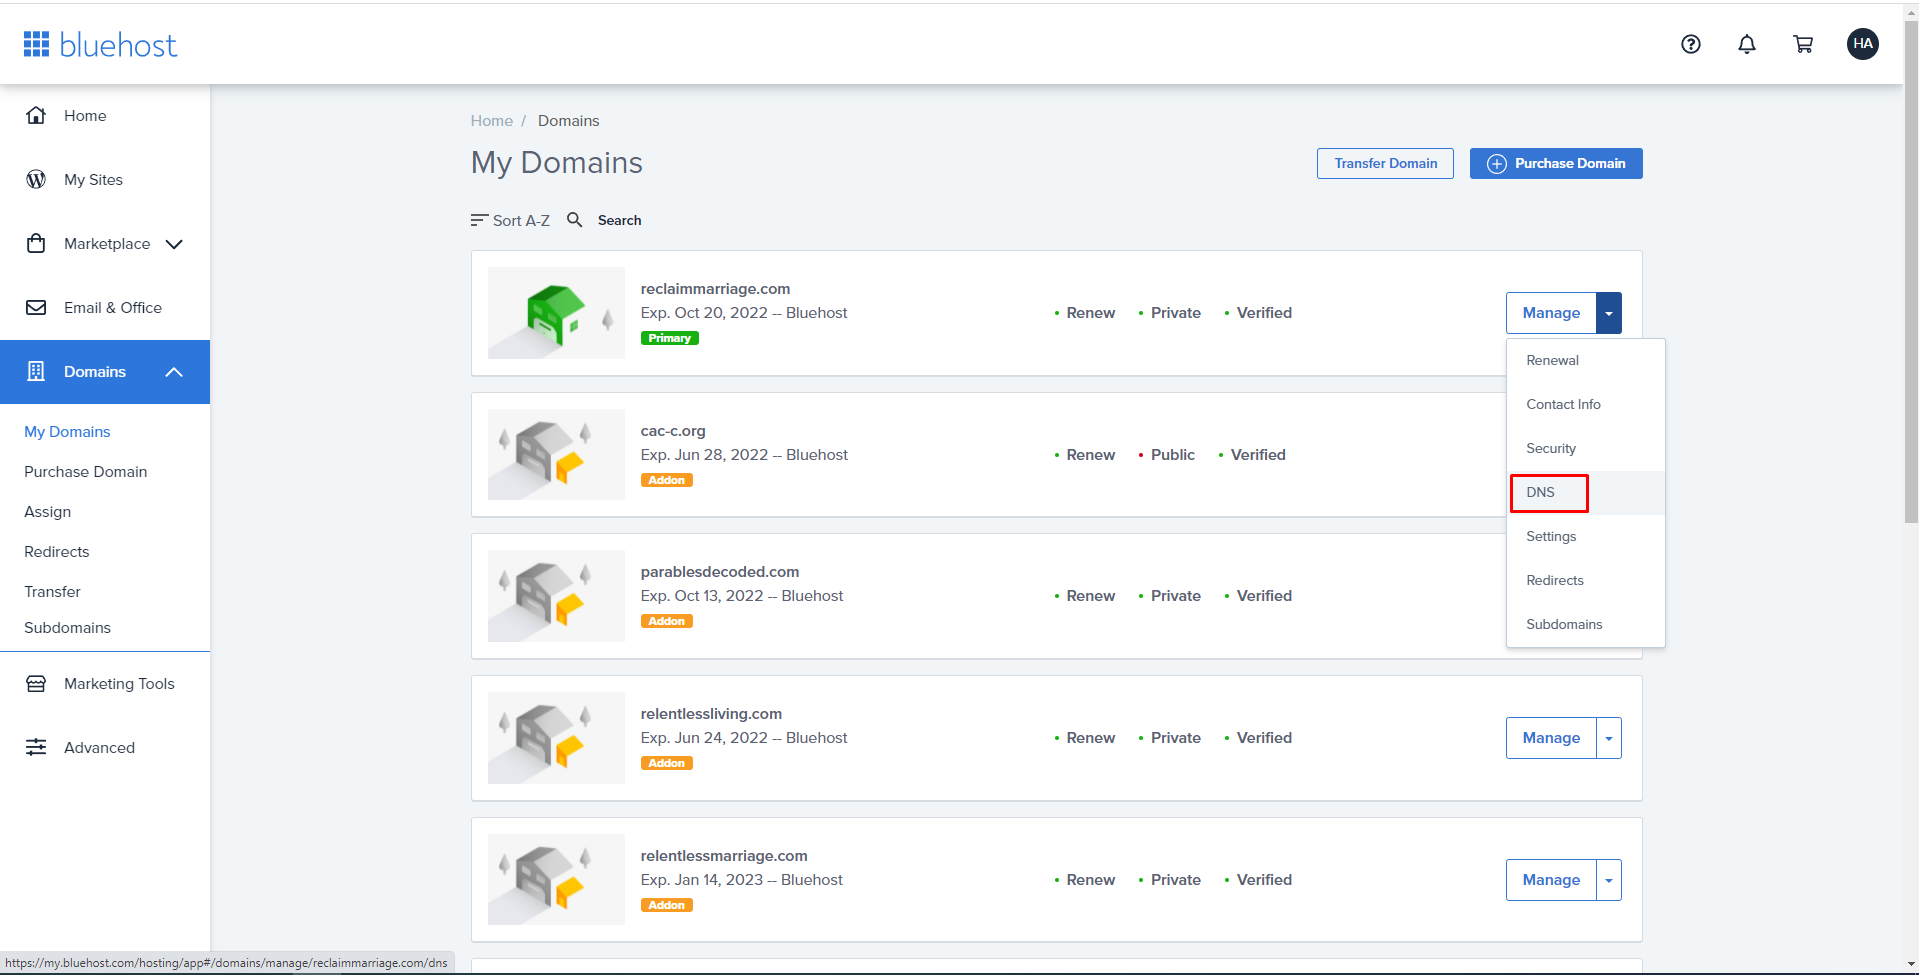
On the respective domain, select ‘DNS’ option under the ‘Manage’ dropdown
Add a record
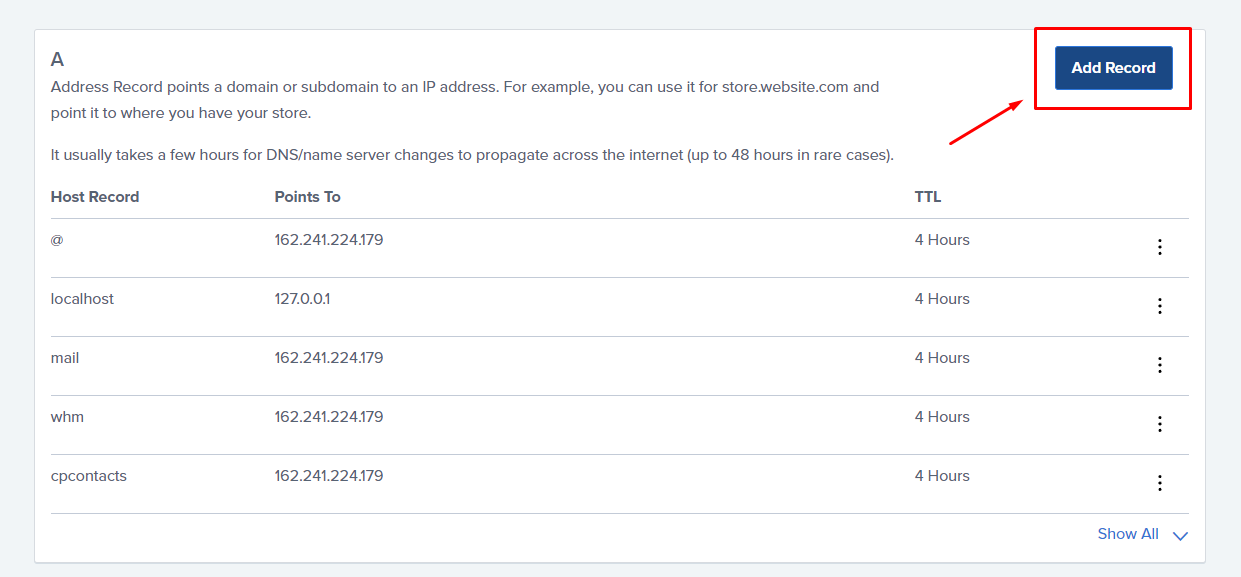
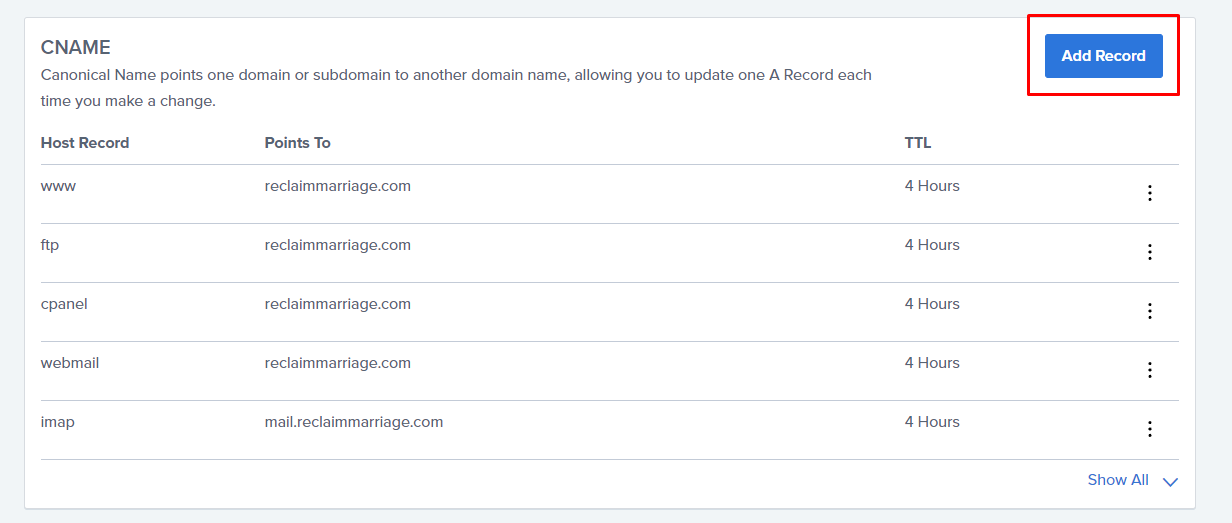
Click on the 'Add Record' button to add DNS records.
Select record type
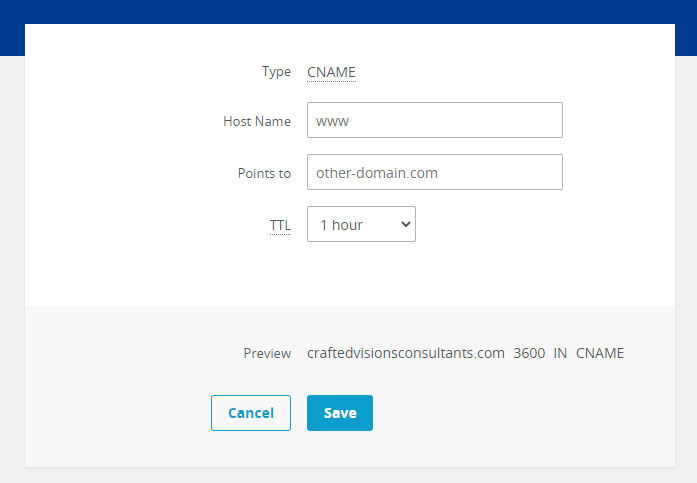
To select the proper type of DNS record, you can define that from System-provided DNS records. Please, check the screenshot
Sample format of DNS record
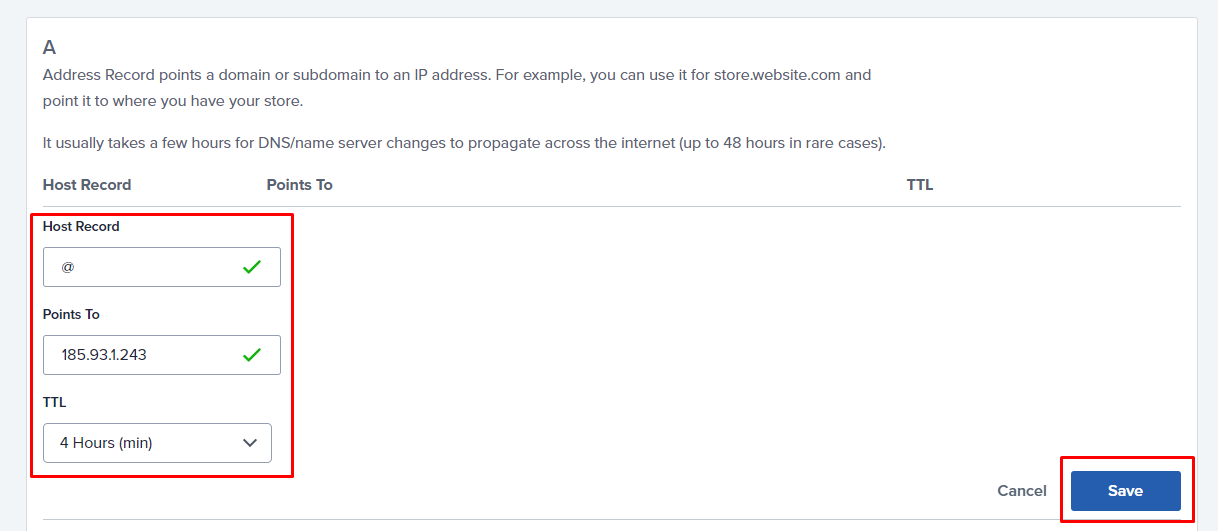
‘A’ type of record
Host Record-> @
Points To -> 185.93.1.243
There is no need to change any other default values. Please click on the 'Add record' button to save the record.
‘CNAME’ type of record
You will have to add the CNAME records in the following way.
Host Record -> em3206
Points To-> u22813504.wl005.sendgrid.net
TTL -> 4 hour
Steps to add DNS record to GoDaddy Account
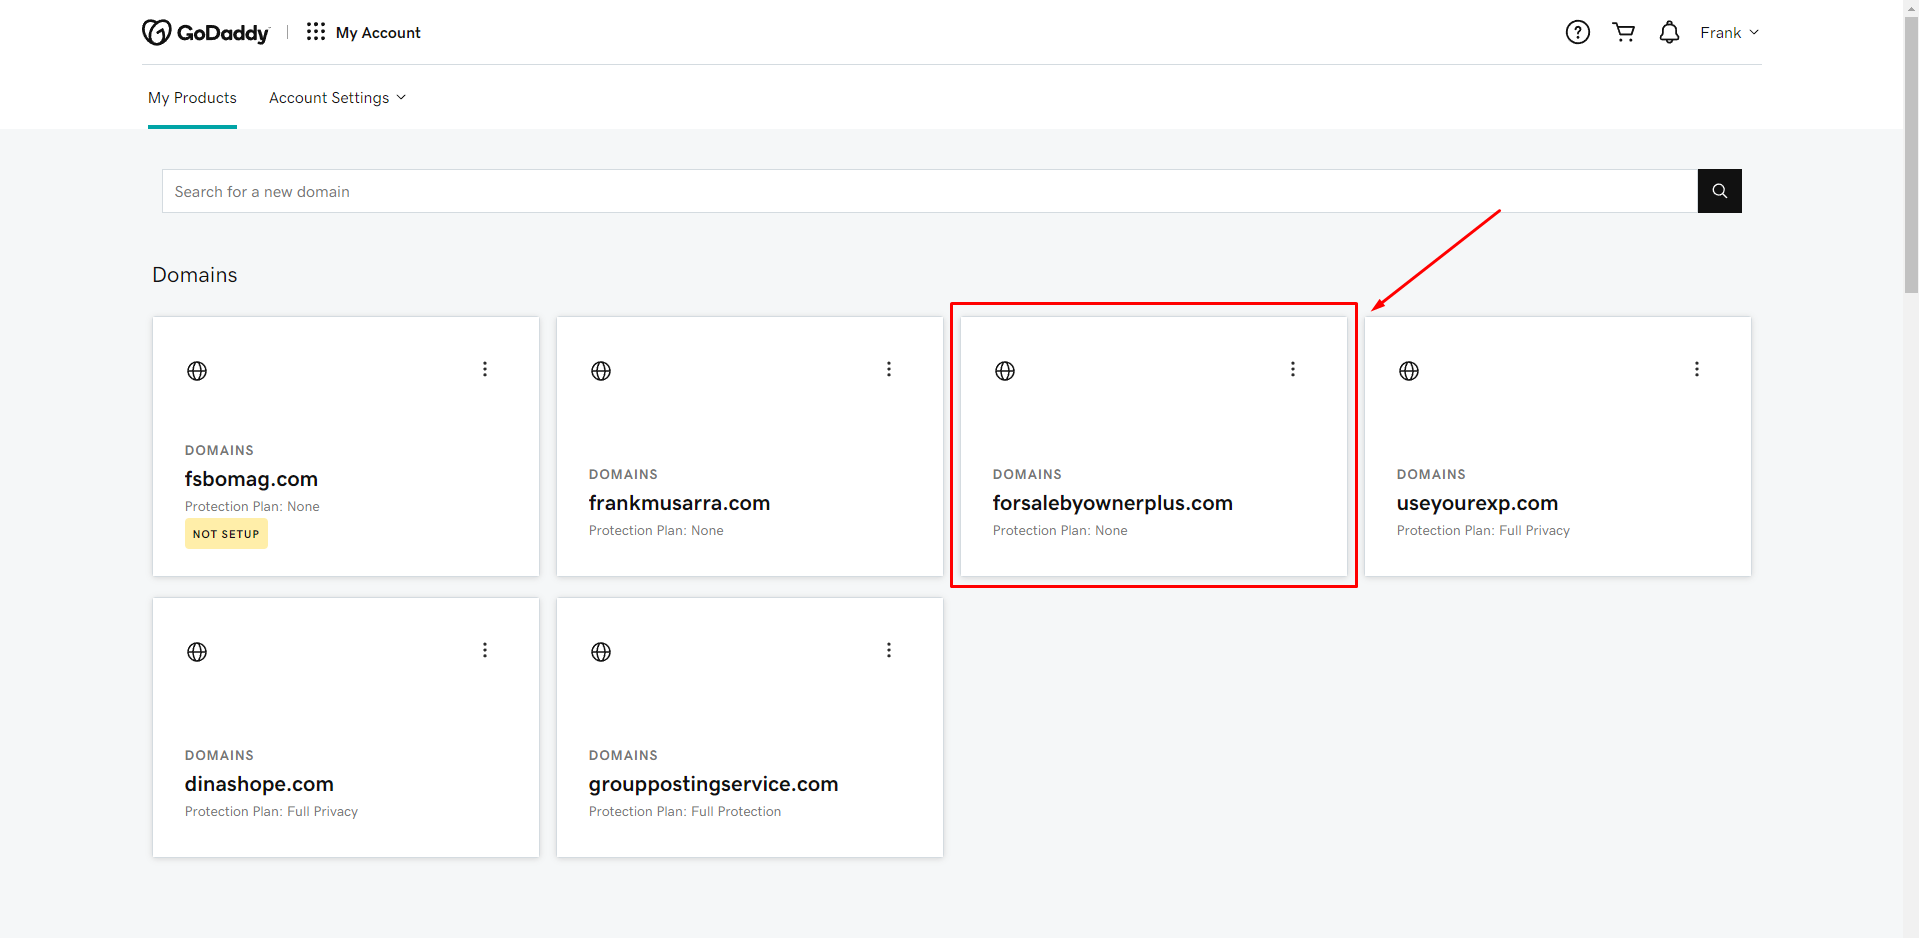
Select domain
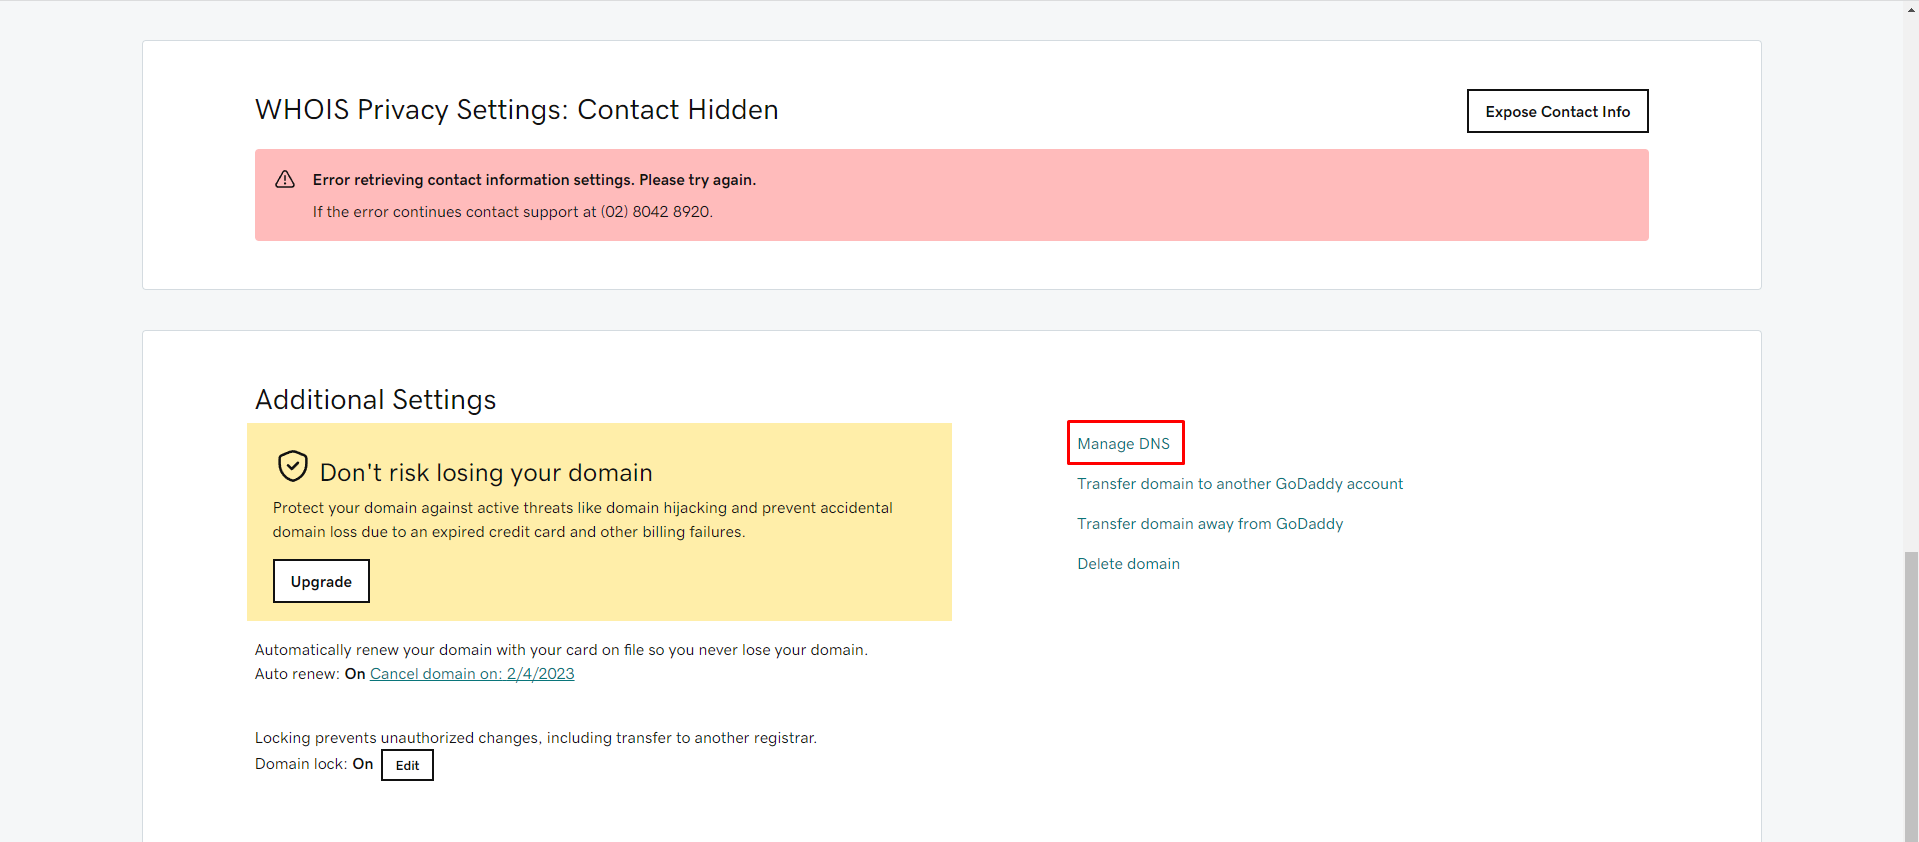
After logging in, please, select your concerned domain name.
After opening that domain page, navigate to the bottom of that domain page, and click on the 'Manage DNS' button.
Add a record
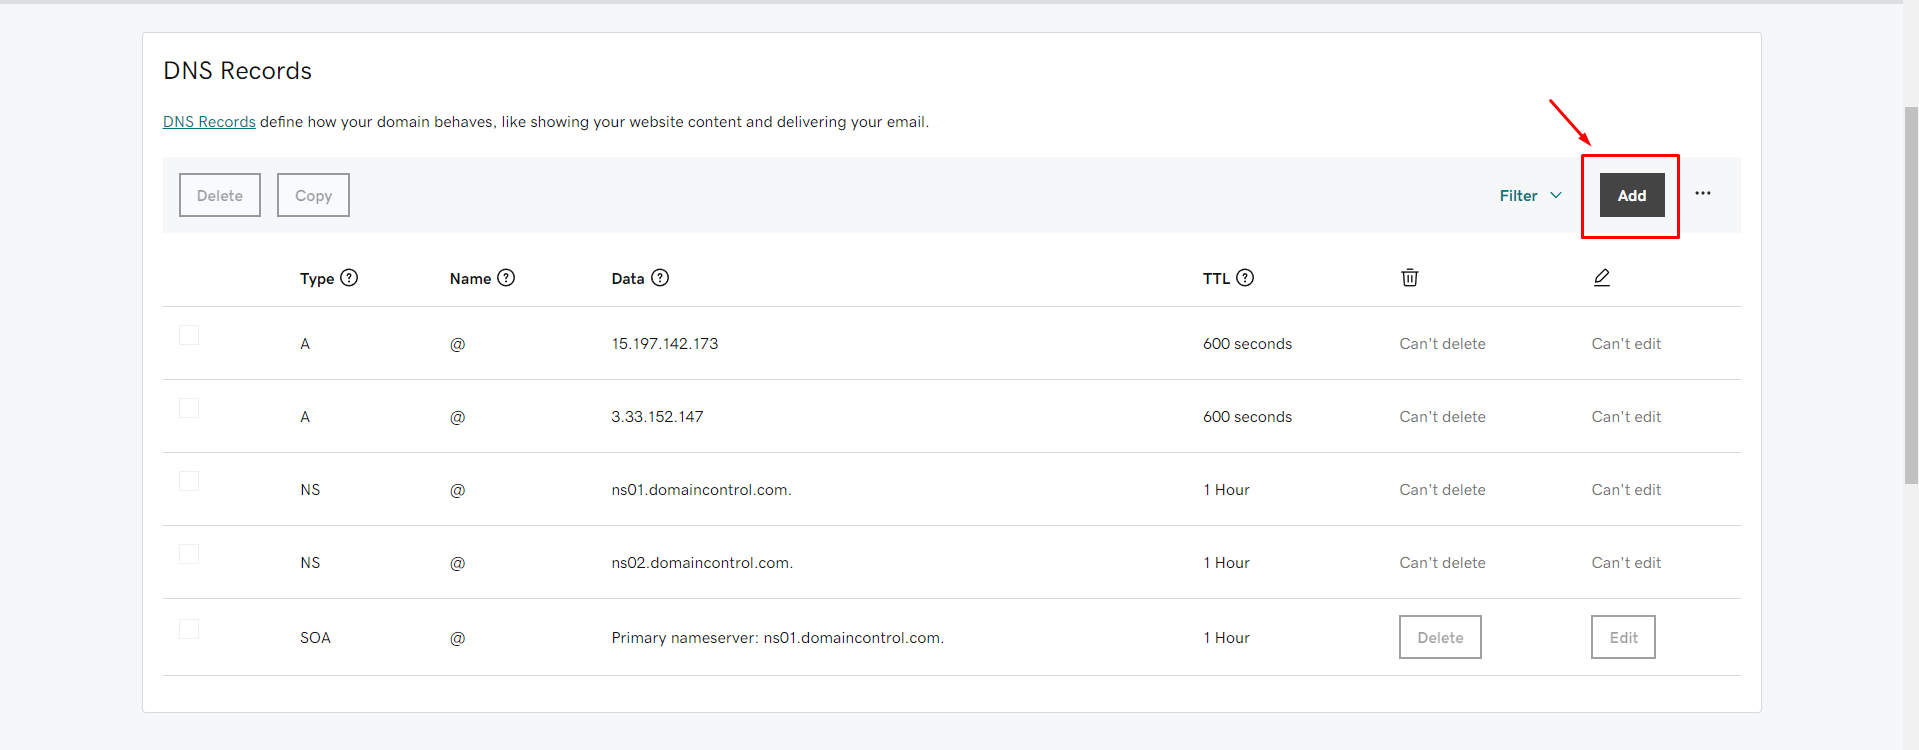
Click on the 'Add' button to add DNS records.
Select record type
If you click on the 'Type' dropdown, you will get the option to select different types of records.
To select the proper type of DNS record, you can define that from System-provided DNS records. Please, check the screenshot
Sample format of DNS record
‘A’ type of record
Name -> @
Value-> 185.93.1.243
There is no need to change any other default values. Please click on the 'Add record' button to save the record.
‘CNAME’ type of record
You will have to add the CNAME records in the following way.
Name -> em3206
Value -> u22813504.wl005.sendgrid.net
TTL -> 24 hour
Steps to add DNS record to SiteGround Account
Select domain
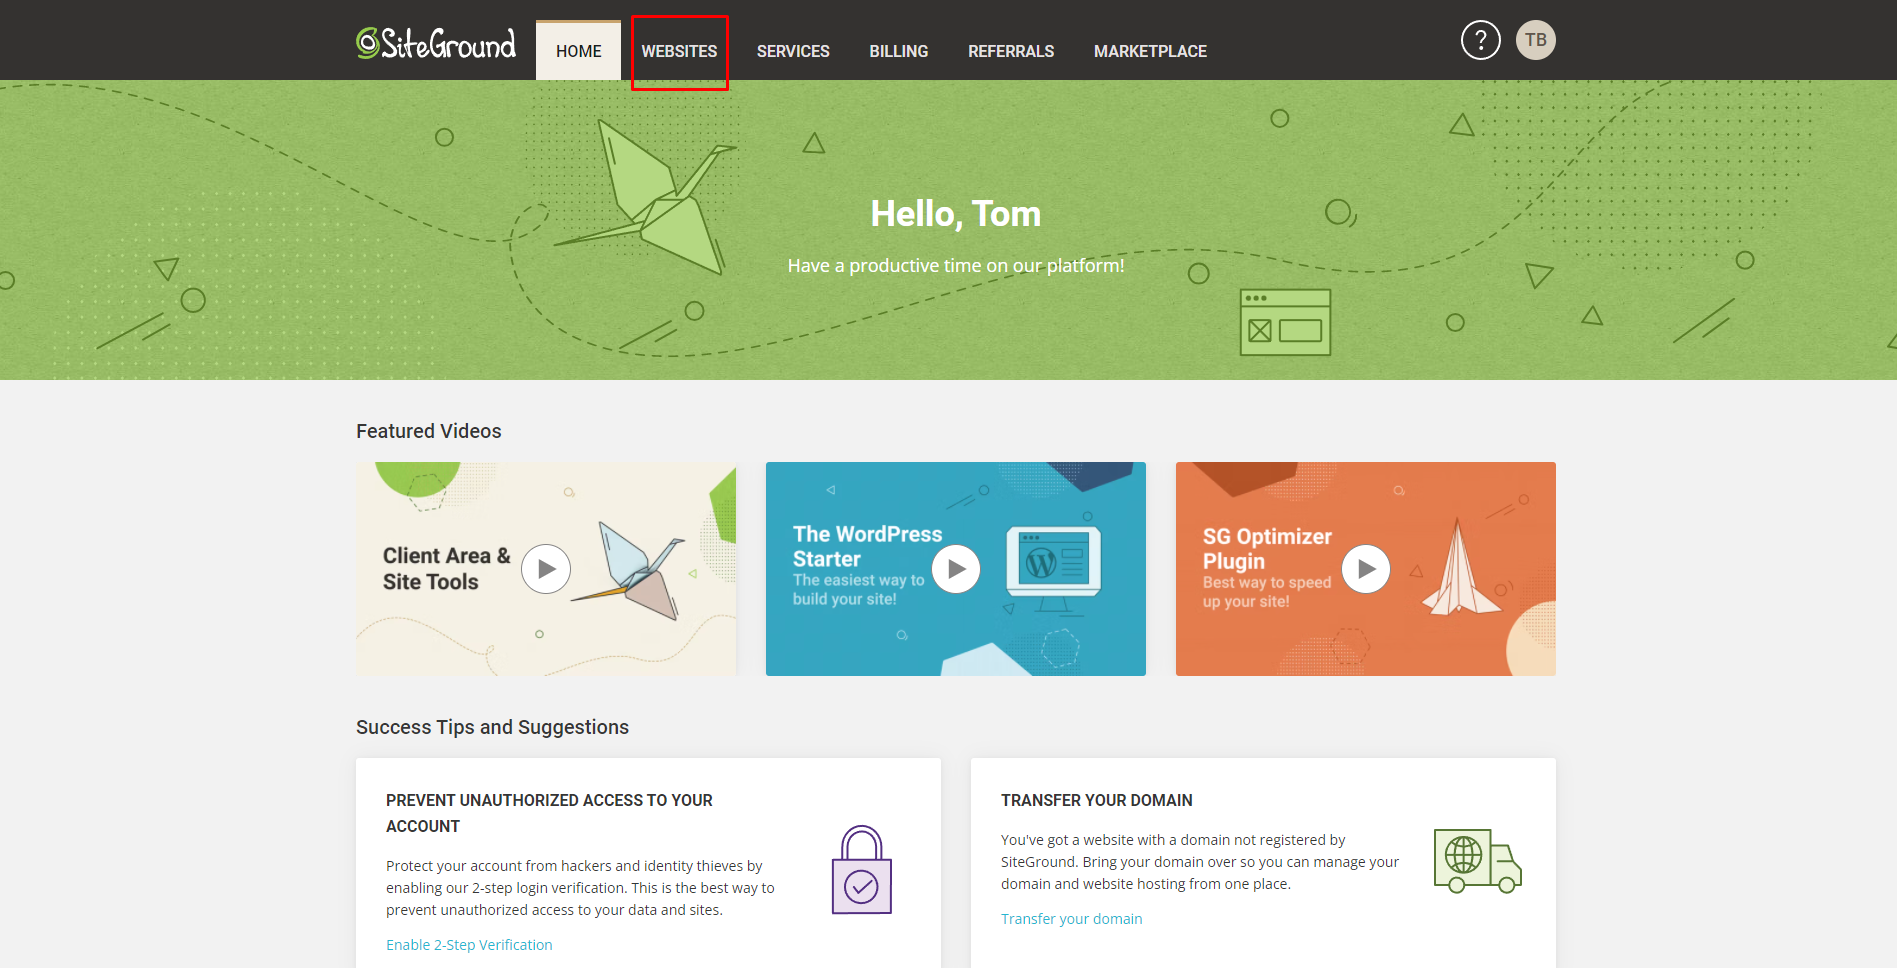
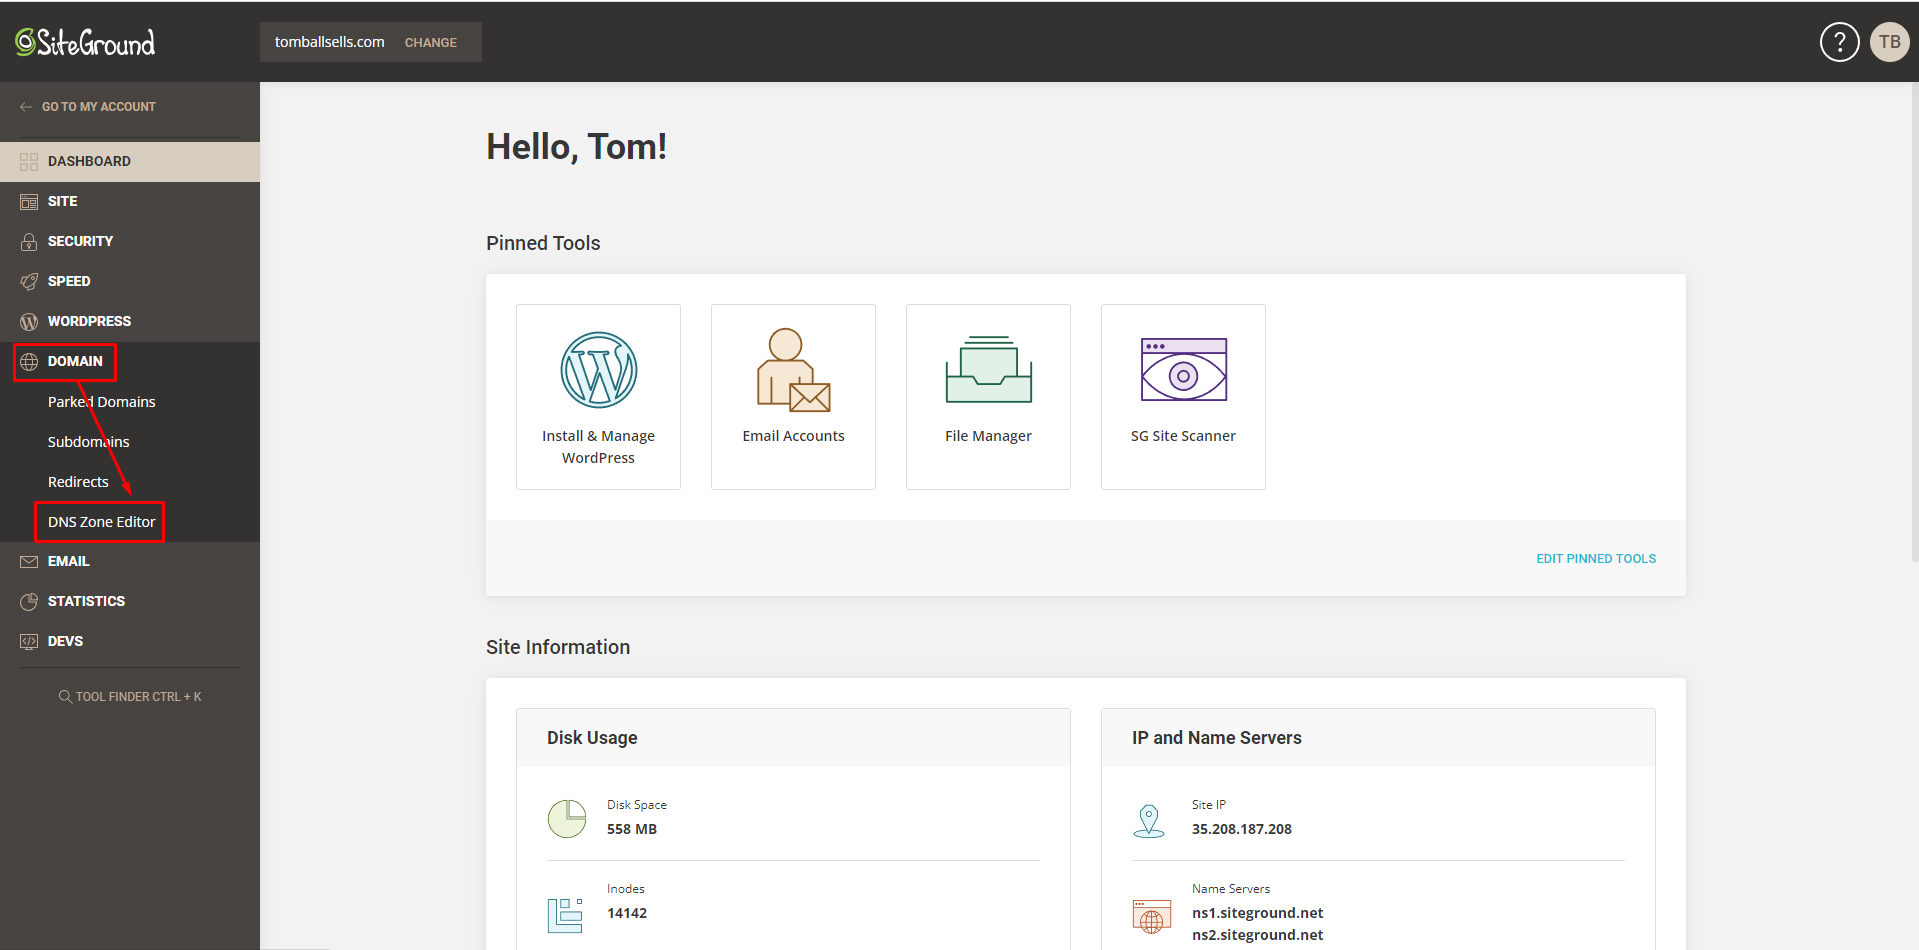
After logging in, please, click on the top 'WEBSITES' button.
Now, click on the 'SITE TOOLS' button of the concerned domain.
Now, click on the 'DNS Zone Editor' under the 'DOMAIN' menu.
Select record type
To select the proper type of DNS record, you can define that from System-provided DNS records. Please, check the screenshot
Sample format of DNS record
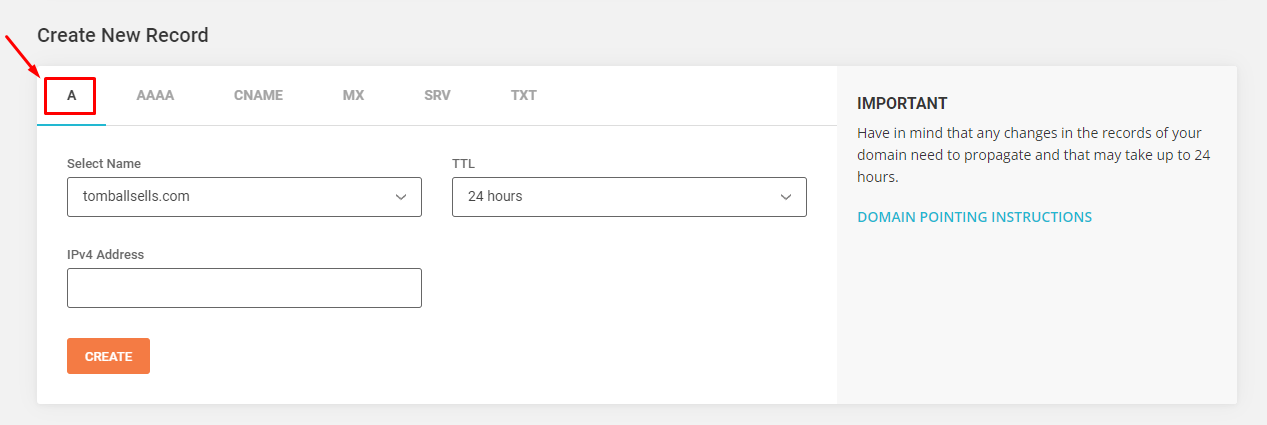
‘A’ type of record
Select Name-> ericdomain.com
IPv4 Address -> 185.93.1.243
TTL → 24 Hours
There is no need to change any other default values. Please click on the 'Create' button to save the record.
‘CNAME’ type of record
You will have to add the CNAME records in the following way.
Name -> em3206
Resolves To-> u22813504.wl005.sendgrid.net
TTL -> 24 hours
Steps to add DNS record to NameCheap Account
Select domain
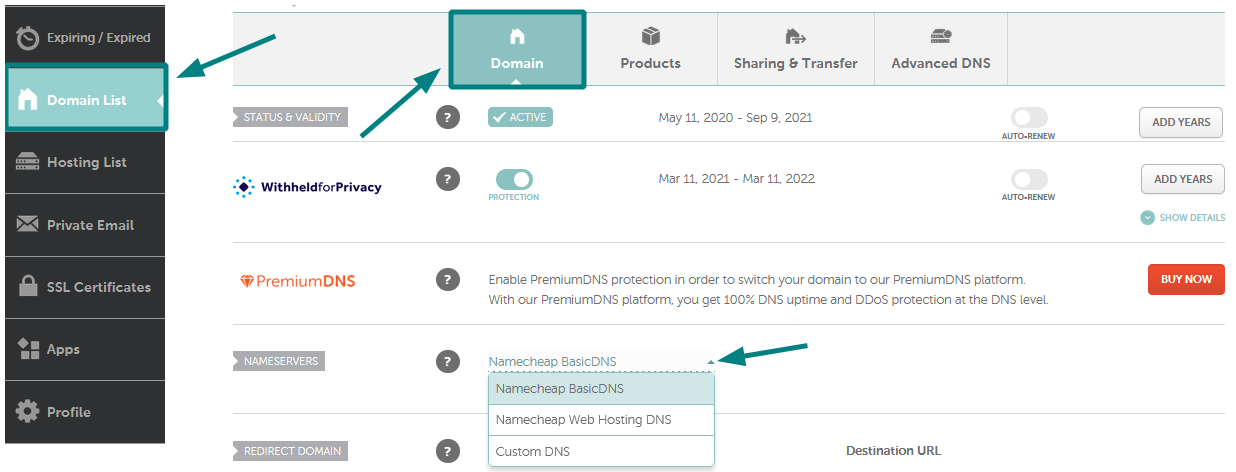
After signing in to your NeamCheap account, Select Domain List from the left sidebar and click on the Manage button next to your domain
Open DNS manager
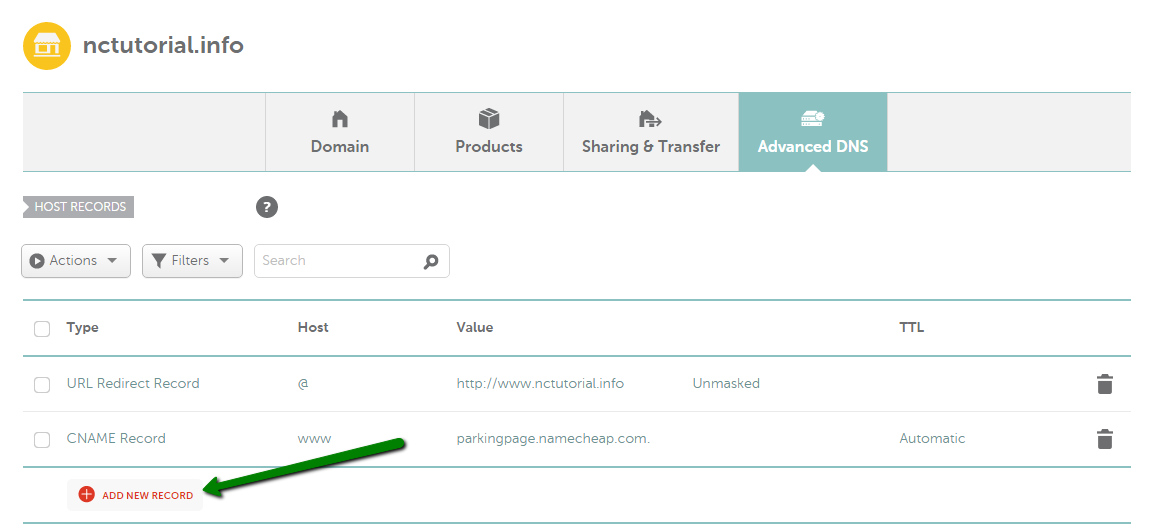
Navigate to the Advanced DNS tab at the top of the page:
Find the Host records section and click on the Add New Record button:
Select record type
To select the proper type of DNS record, you can define that from System-provided DNS records. Please, check the screenshot
Sample format of DNS record
‘A’ type of record
Host -> @
Value-> 185.93.1.243
There is no need to change any other default values. Please click on the 'Add record' button to save the record.
‘CNAME’ type of record
You will have to add the CNAME records in the following way.
Host -> em3206
Value -> u22813504.wl005.sendgrid.net
TTL -> 24 hour
Check the nameservers
Sign in to your Namecheap account. Select Domain List from the left sidebar and click the Manage button next to your domain:
Find the Nameservers section and make sure Namecheap BasicDNS/Namecheap Web Hosting DNS is selected.
Setup Email Forwarding in NameCheap:
To set up email forwarding in Namecheap, you can follow these steps:
- Log in to your Namecheap account and go to the dashboard.
- Click on the "Email Forwarding" option from the left-hand sidebar.
- Click on the "Add Forward" button.
- In the "Forward To" field, enter the email address where you want to forward your emails.
- In the "Forward From" field, enter the email address from where you want to forward your emails.
- Click on the "Add" button to save your changes.
Note: If you want to forward emails to multiple email addresses, you can enter multiple email addresses separated by commas in the "Forward To" field.
That's it! Your email forwarding should now be set up and any emails sent to the "Forward From" email address will be automatically forwarded to the "Forward To" email address.
