Steps to Connect the Domain.
STEP 1: Open the domain panel
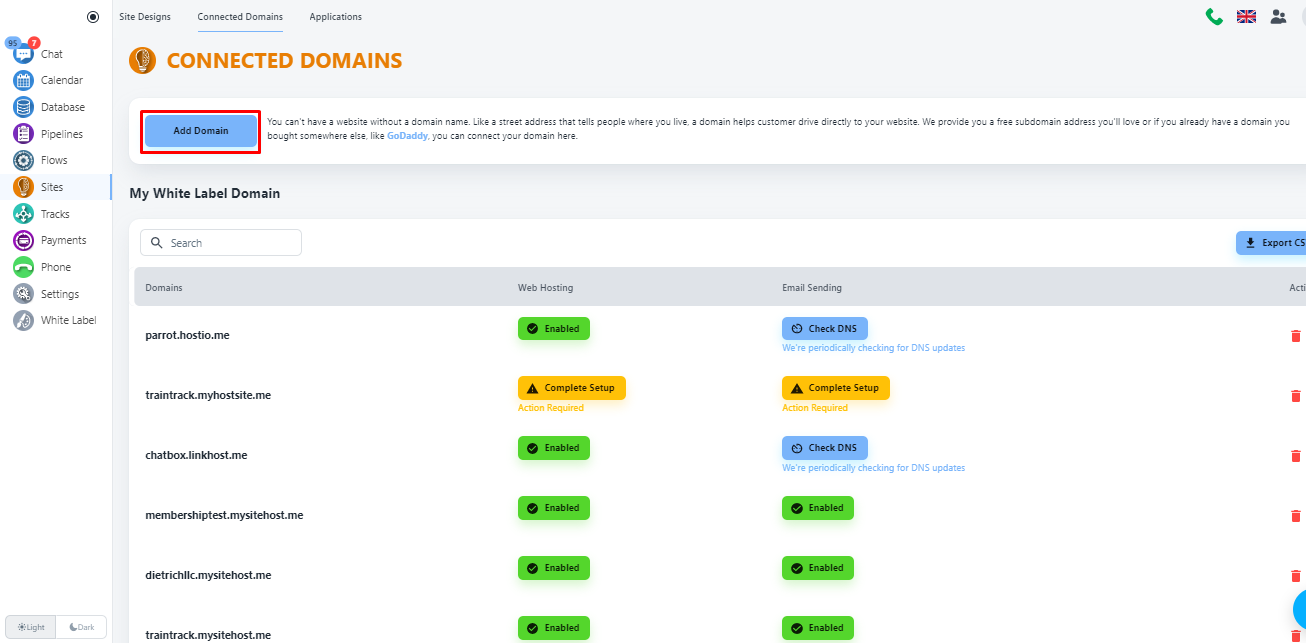
Navigate to the domain panel by clicking the “Sites” on the left side menu. Then when you have that page open you will see a link to “Connected Domains” on the top of your page, please click that.
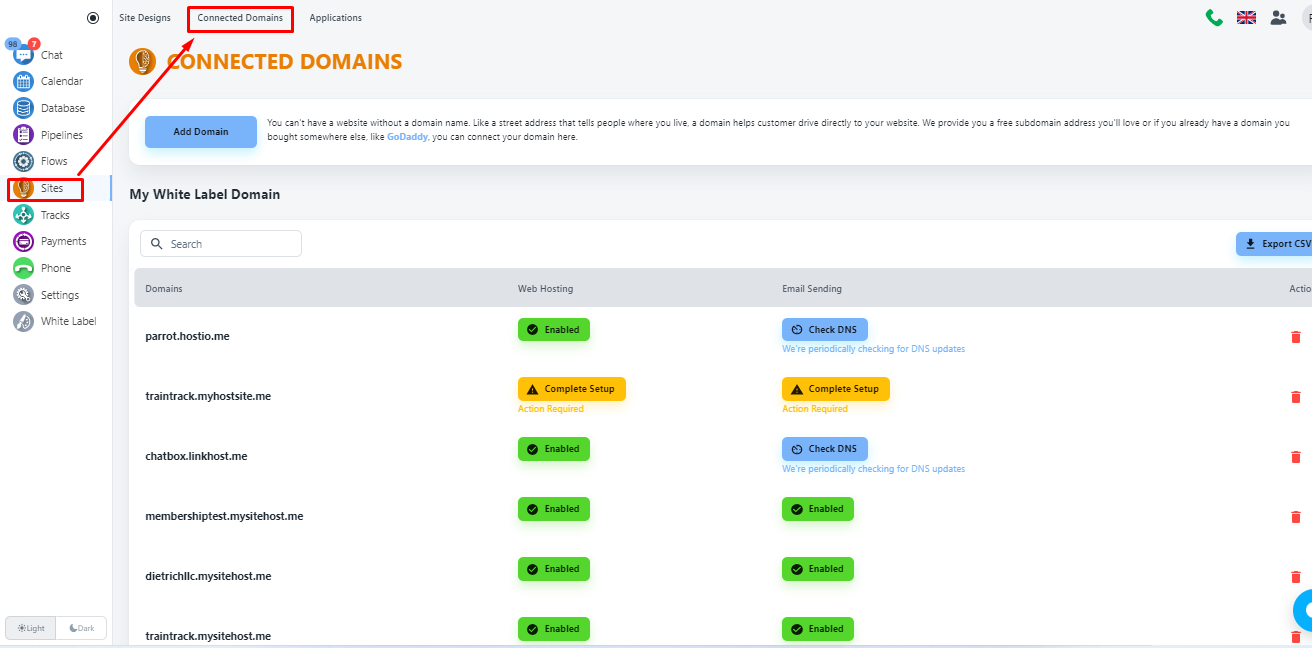
Now, click on the ‘Add Domain’ button to add your domain.

STEP 2: Select domain type
The system will allow you to add a free domain or custom domain. For our case, we will select the second option, and put your domain name.
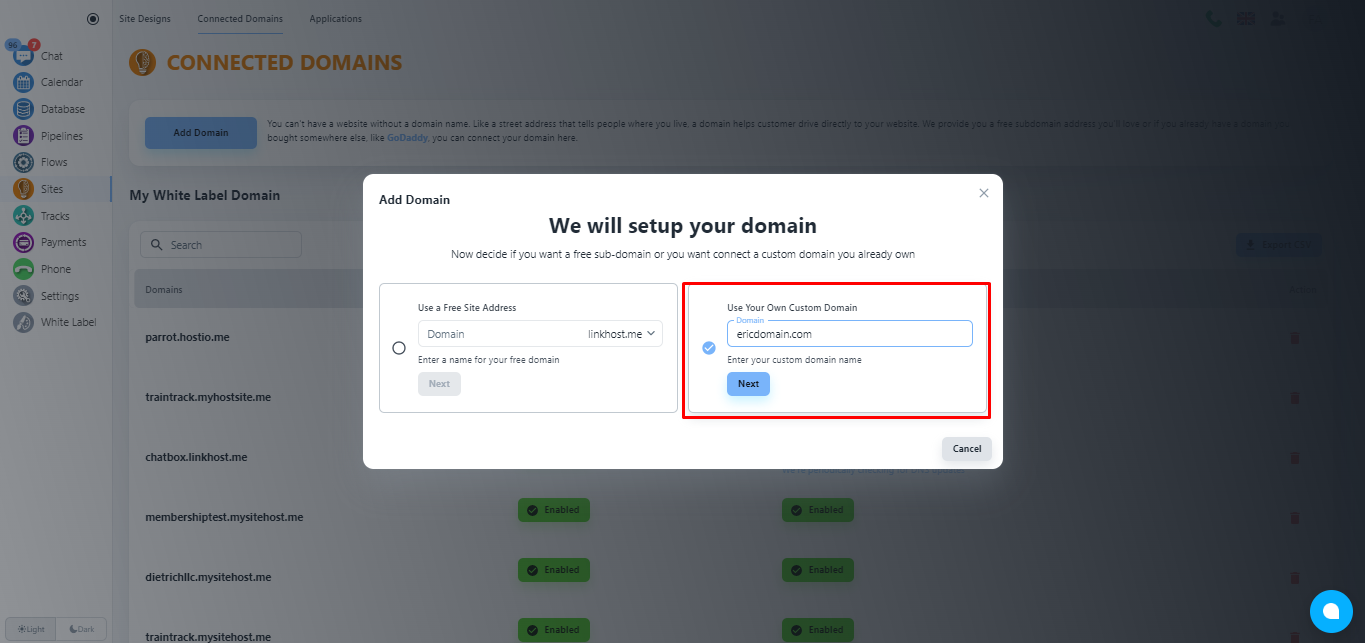
Click on the ‘Next’ button.
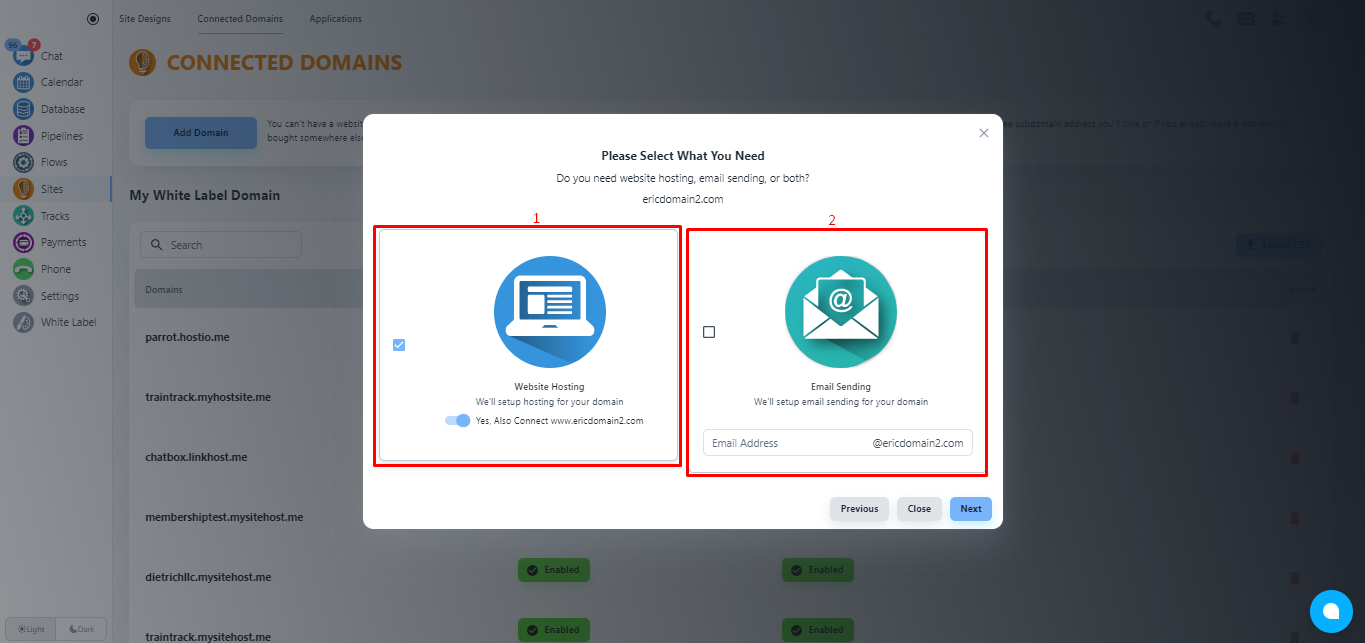
STEP 3: Select services
Now, the system will offer you services. By default, the Website Hosting service will be enabled.
💡 When to use email sending? If you also need the Email service, please, click on the checkbox of the second tab, and add the email address that you want to add with system for email services.

💡 Adding email service will not hamper your existing email services.
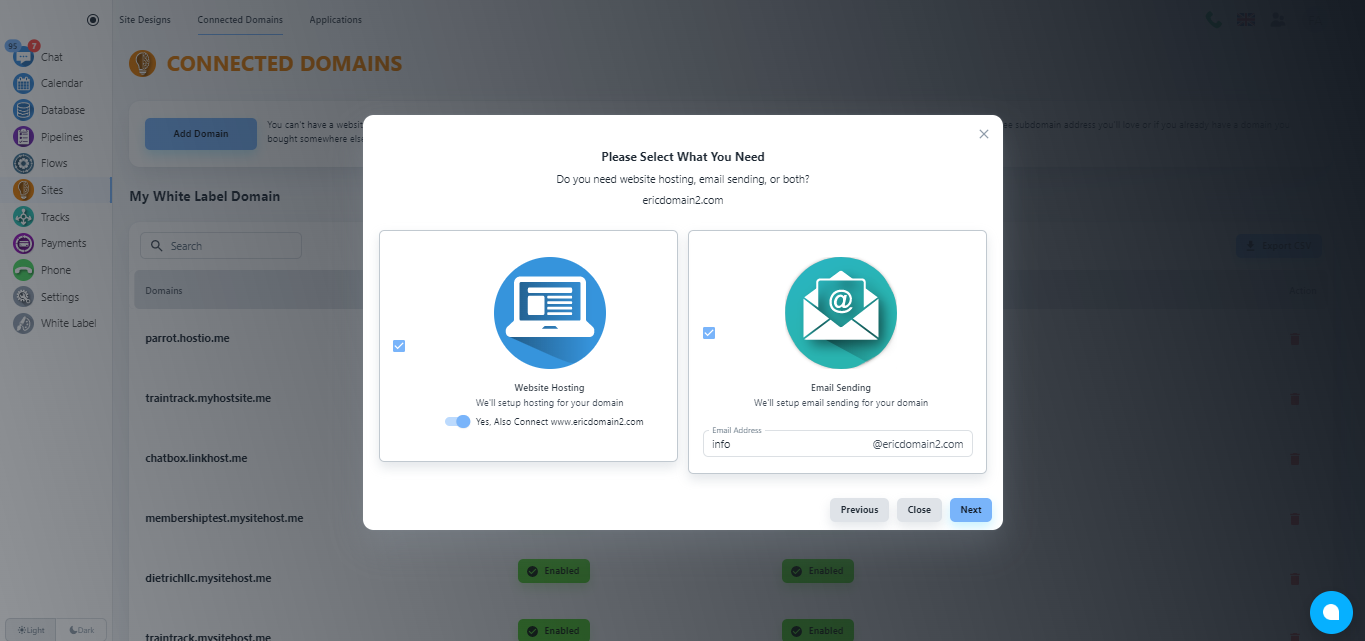
Please, click on the ‘Next’ button.
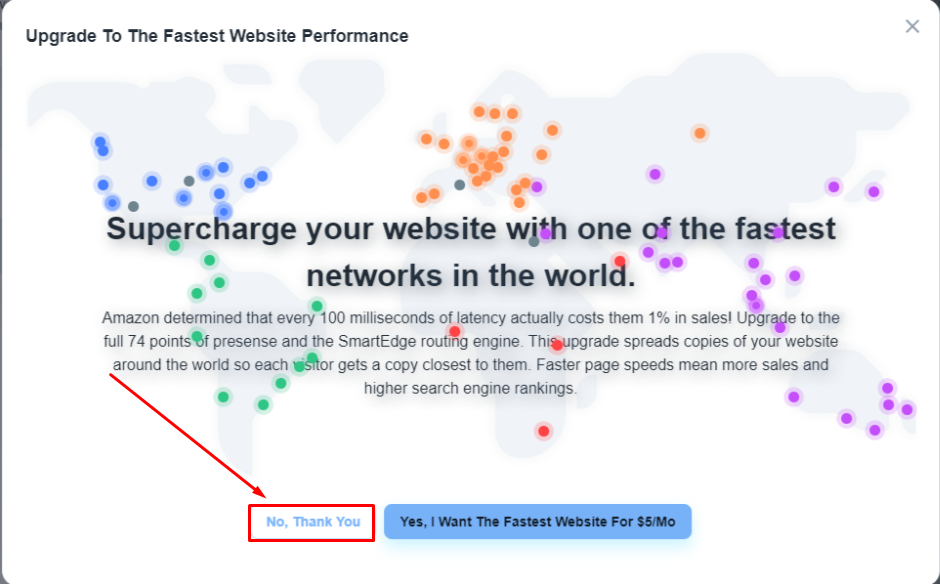
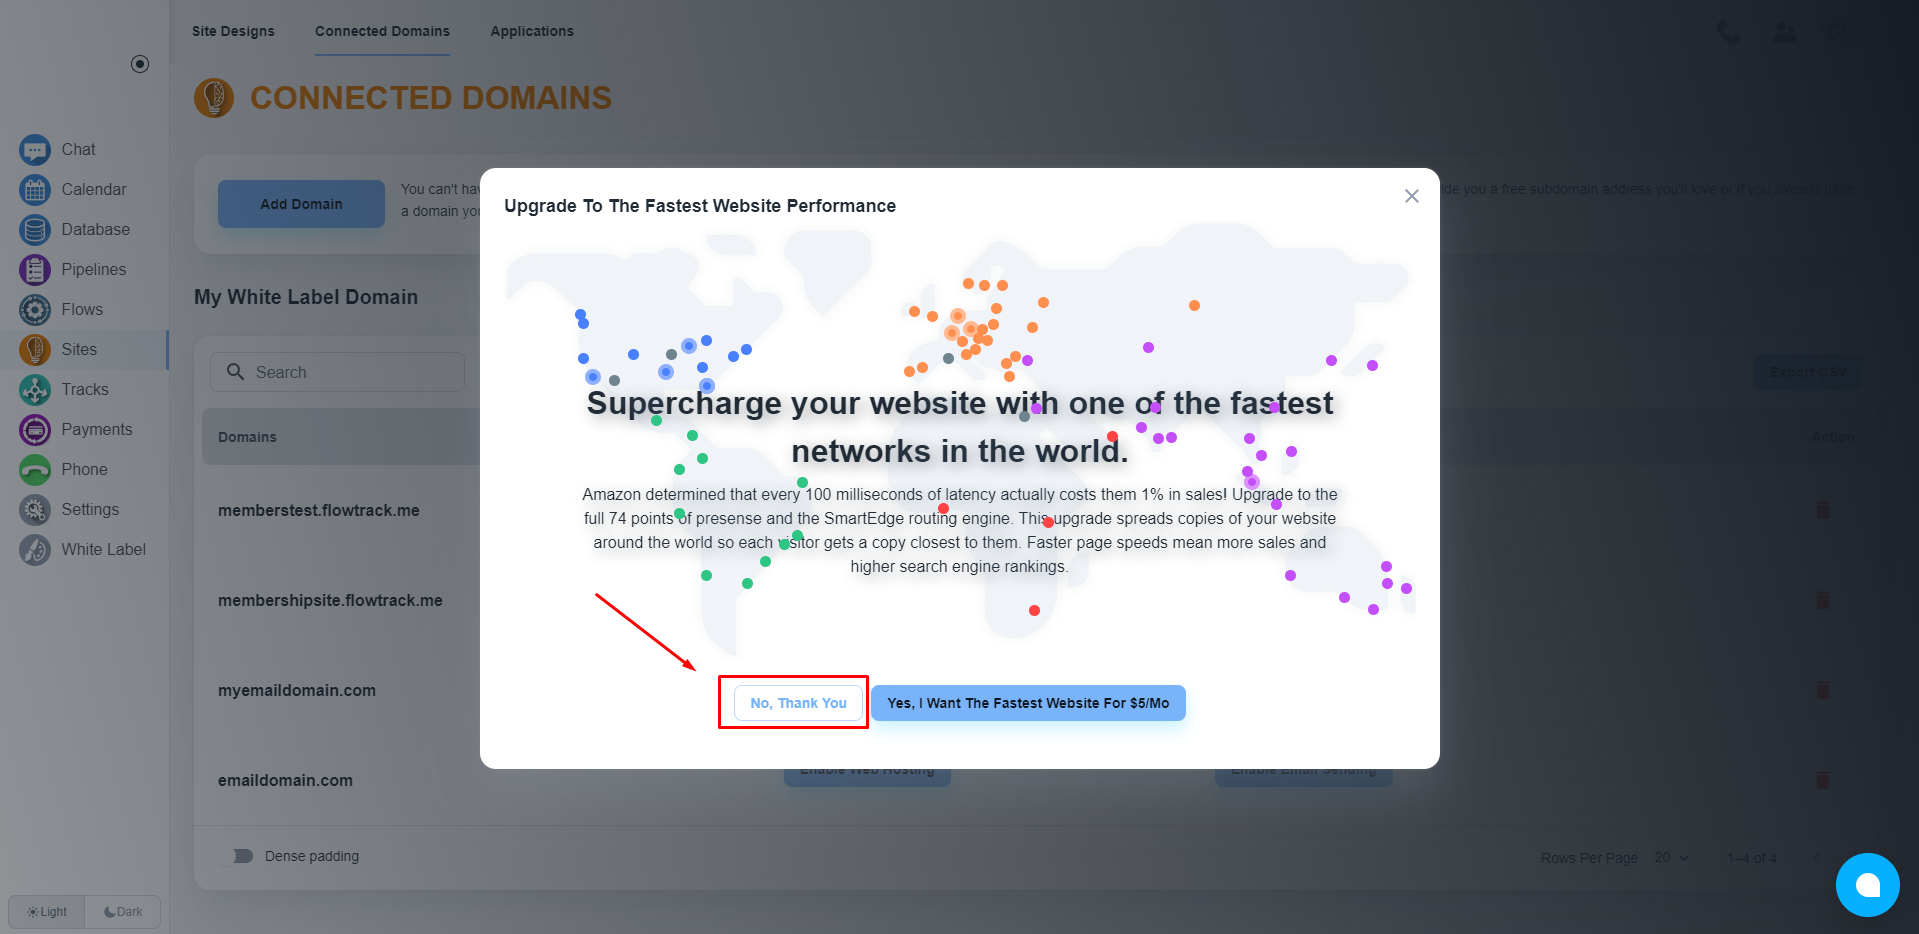
STEP 4: Choose faster CDN (optional)
Now, the system will offer you the option to choose a faster CDN for a better web service experience for your users. Please, click on the ‘No, Thank You’ button unless you want a faster CDN for $5/month.

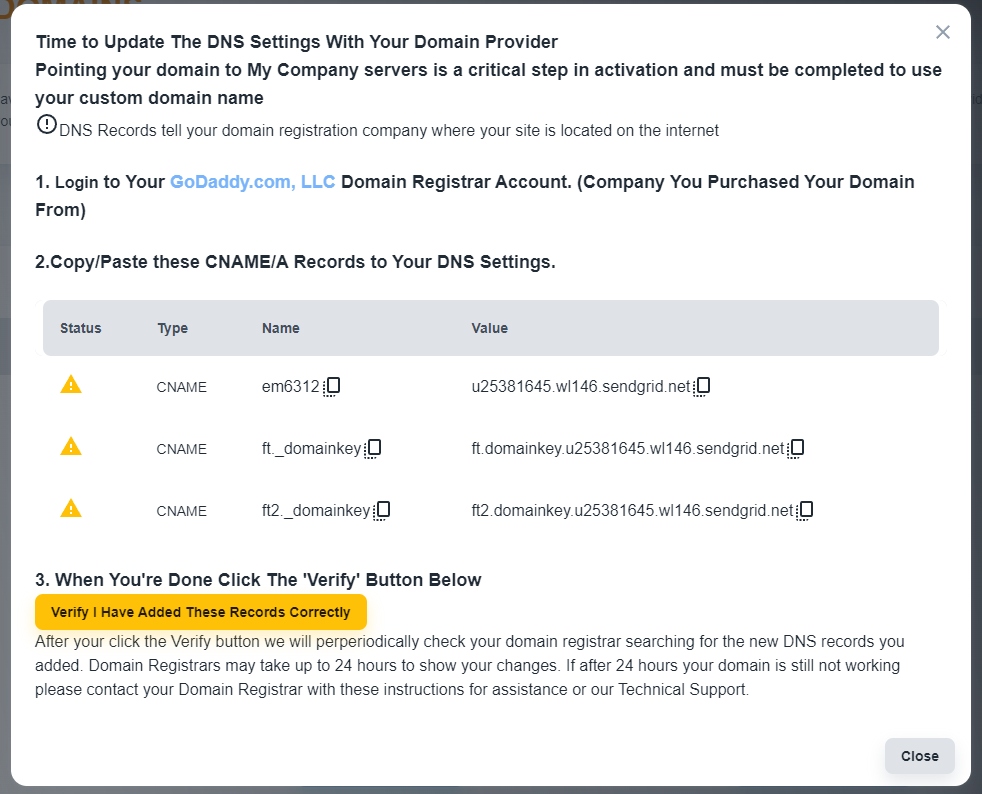
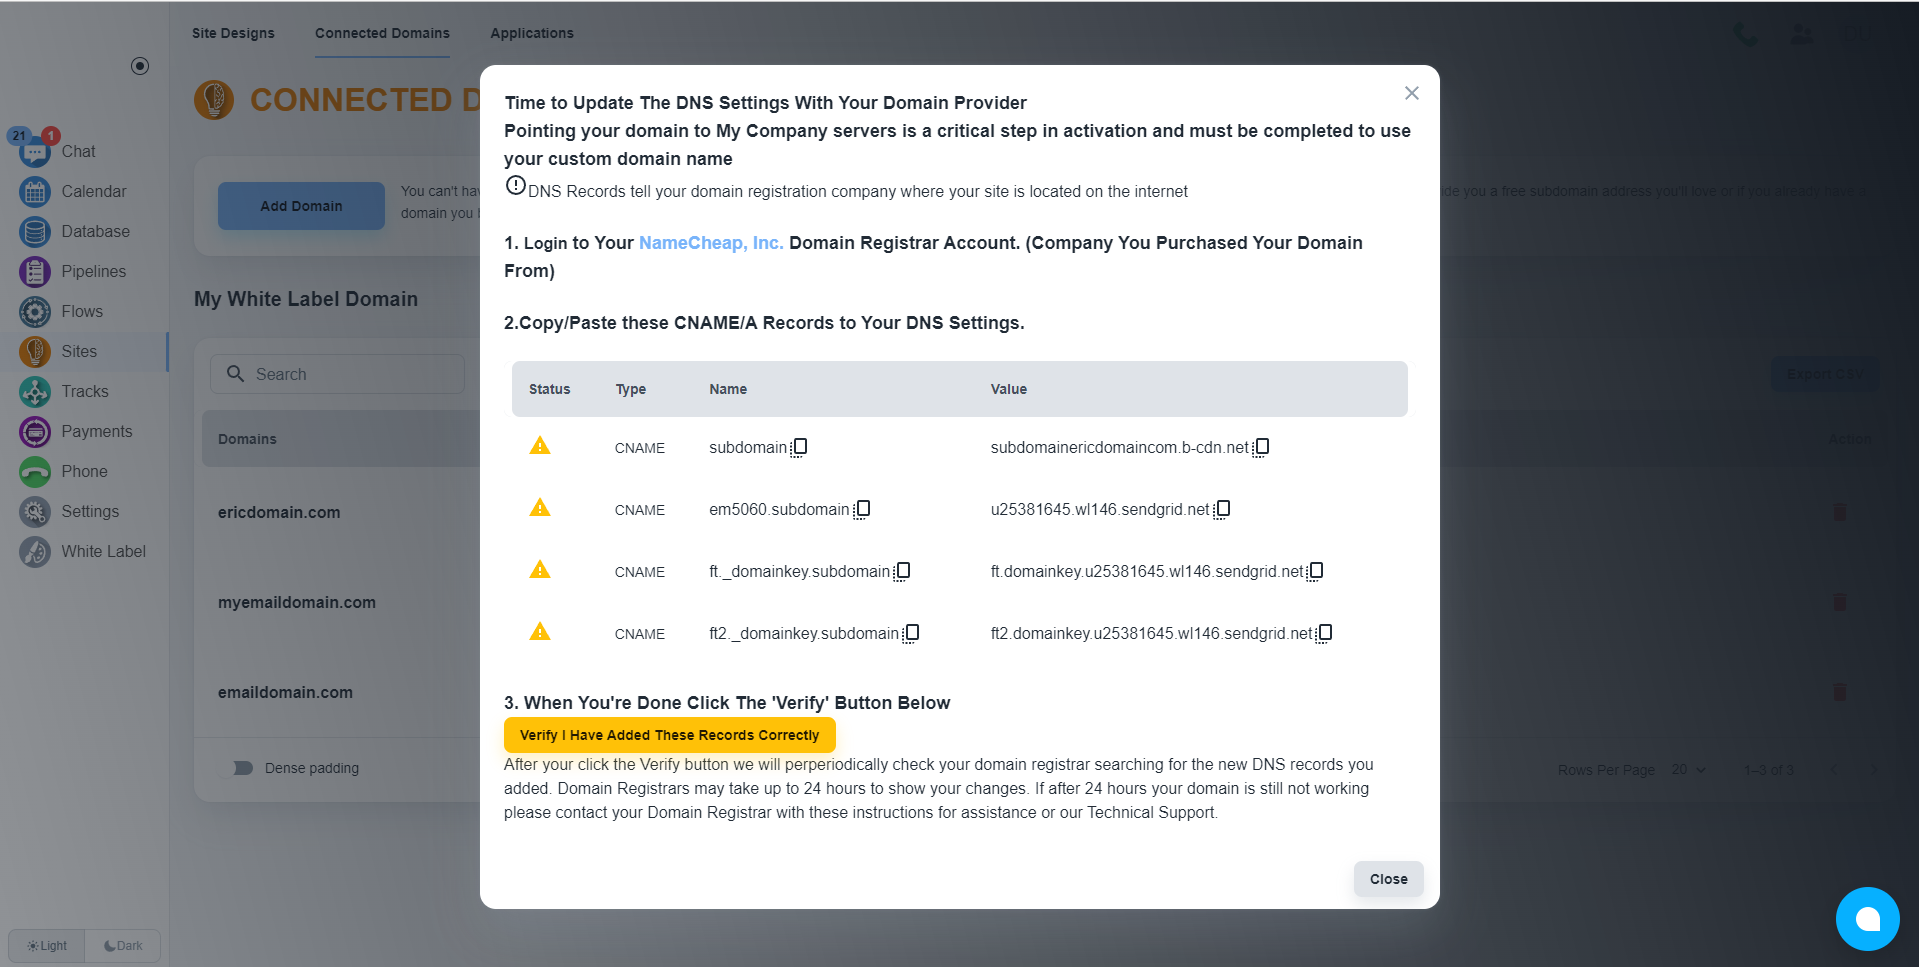
STEP 5: Collect DNS records
Please, wait for a while, the system will provide you with the required DNS records that you need to add to your domain registrar.
Steps to Connect the Domain with System
STEP 1: Open the domain panel
Navigate to the domain panel by clicking the “Sites” on the left side menu. Then when you have that page open you will see a link to “Connected Domains” on the top of your page, please click that.

Now, click on the ‘Add Domain’ button to add your domain with System

STEP 2: Select domain type
The system will allow you to add a free domain or custom domain. For our case, we will select the second option, and put your domain name. Please take note that you need to delete any existing domain connections you have to be able to connect to the NexLvl App.

Click on the ‘Next’ button.
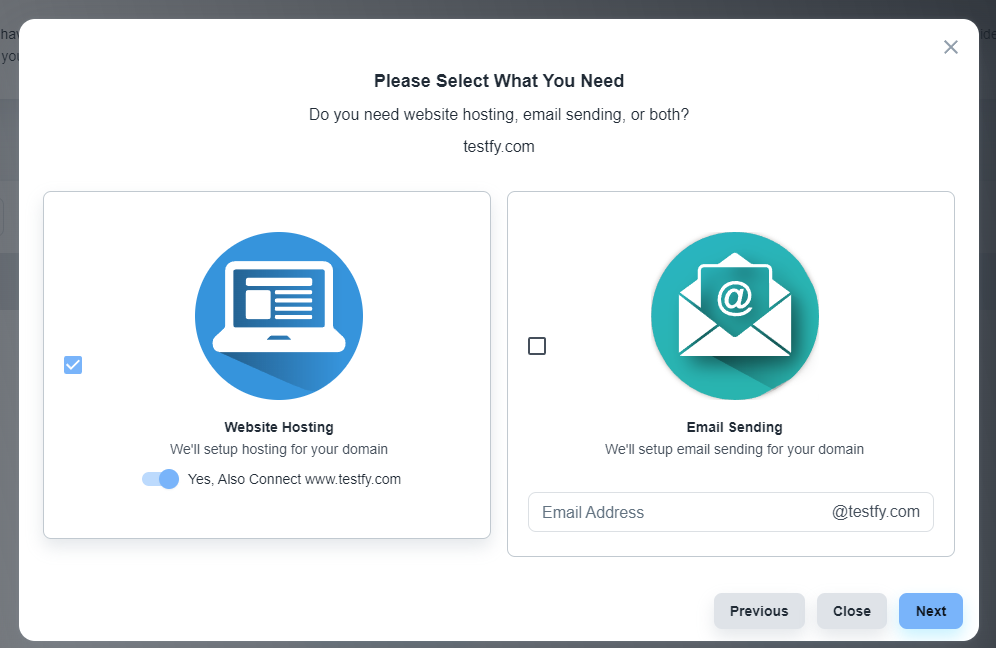
STEP 3: Select services
Now, the system will offer you services. By default, the Website Hosting service will be enabled.
💡 When should I use email sending? If you also need the Email service, click on the checkbox of the second tab, and add the email address that you want to add with your System for email services.
💡 Adding an email service to your System will not hamper your existing email services.
Make sure this option is checked
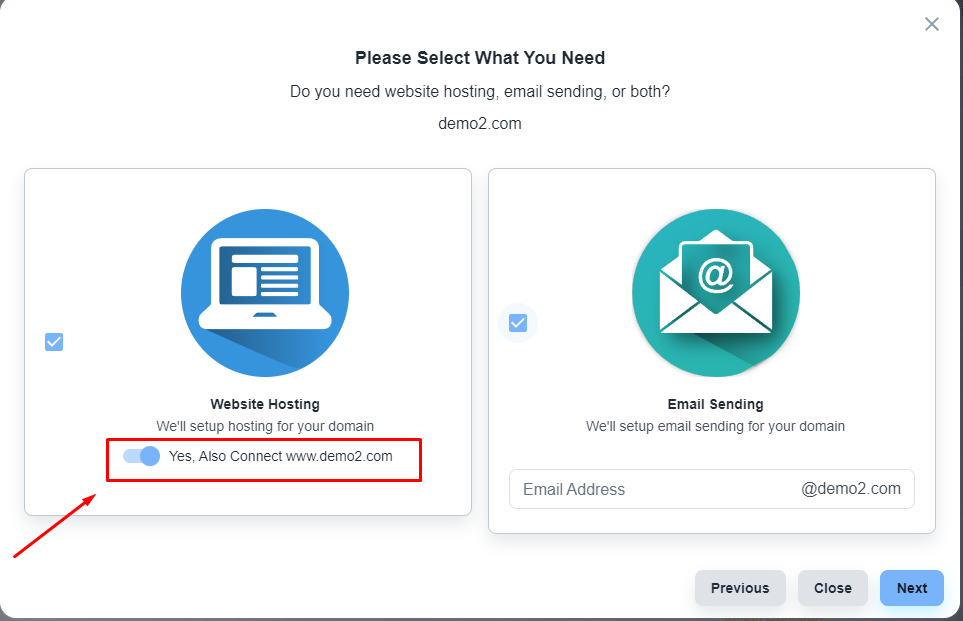
You can add your email address here, so the system automatically creates an inbox. This step is optional. You can do it later.

✅ Please don’t add your email address here to avoid any unwanted issues. After verifying the domain, you can connect your email address.
Click on the ‘Next’ button.
STEP 4: Choose faster CDN (optional)
Now, the system will offer you the option to choose a faster CDN for a better web service experience for your users. Click on the ‘No, Thank You’ button unless you want a faster CDN for $5/month.

 Collect DNS records
Please, wait for a while. The system will provide you with the required DNS records you need to add to your domain registrar.
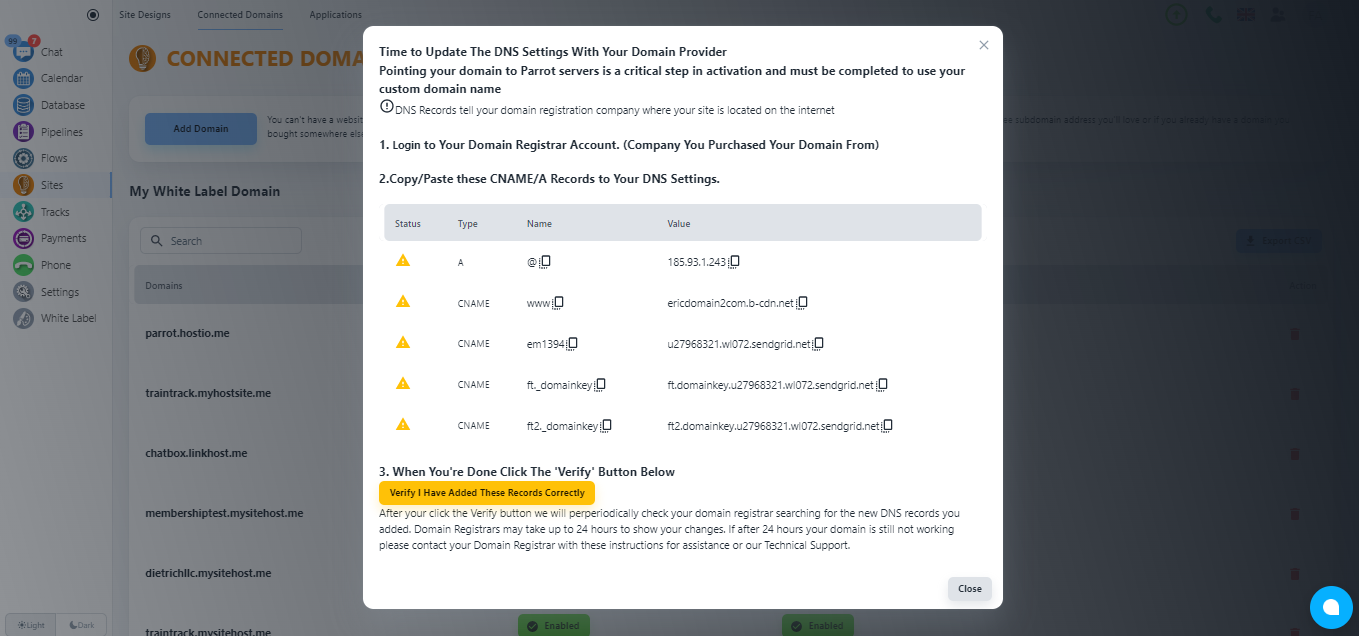
Separating DNS record
DNS record for Web Hosting
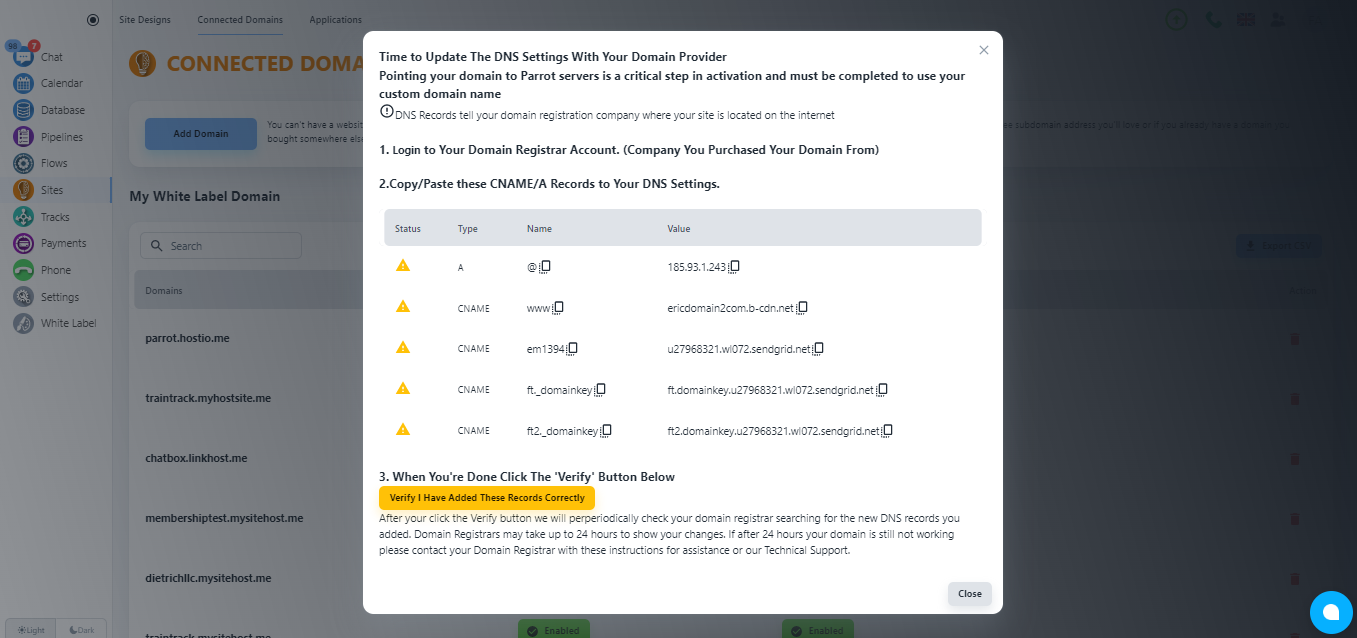
As per the screenshot, the first two records are the DNS record for the WebHosting service. Among them, the first one is an ‘A’ type DNS record.
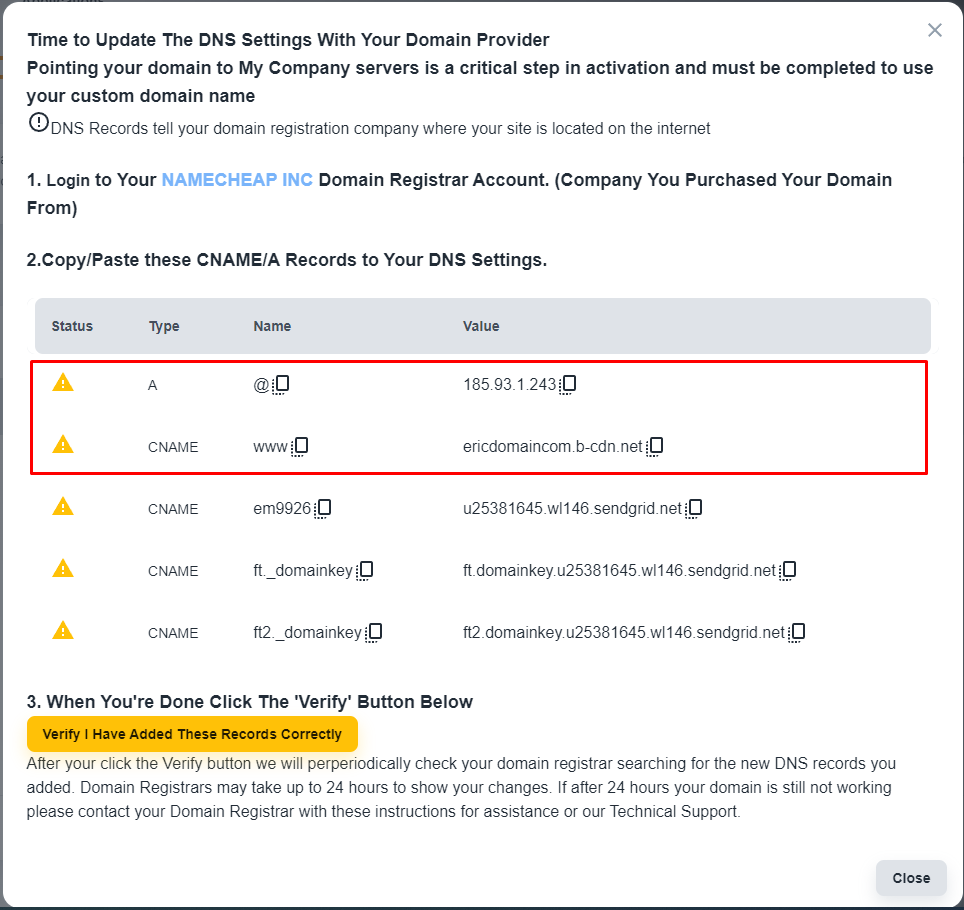
DNS record for Email Service
As per the screenshot, the last three records are related to email services. All of these records are CNAME records.

💡 You can ignore DNS records related to other services if you need only one specific service.
After adding all these DNS records to your domain manager, please wait a while for DNS propagation. It might take 24-48 hours.
Steps to Connect the Domain for Email Service Only
STEP 1: Open the domain panel
Navigate to the domain panel by clicking the “Sites” on the left side menu. Then when you have that page open you will see a link to “Connected Domains” on the top of your page, please click that.

Now, click on the ‘Add Domain’ button to add your domain with System

STEP 2: Select domain type
The system will allow you to add a free domain or custom domain. For our case, we will select the second option and put your domain name.

Click on the ‘Next’ button.
Select services
Now, the system will offer you System services. By default, the Website Hosting service will be enabled.
💡 When to use email sending? If you also need the Email service, please, click on the checkbox of the second tab, and add the email address that you want to add with System for email services.
Please, uncheck the ‘Web Hosting’ and select the ‘Email sending’ option
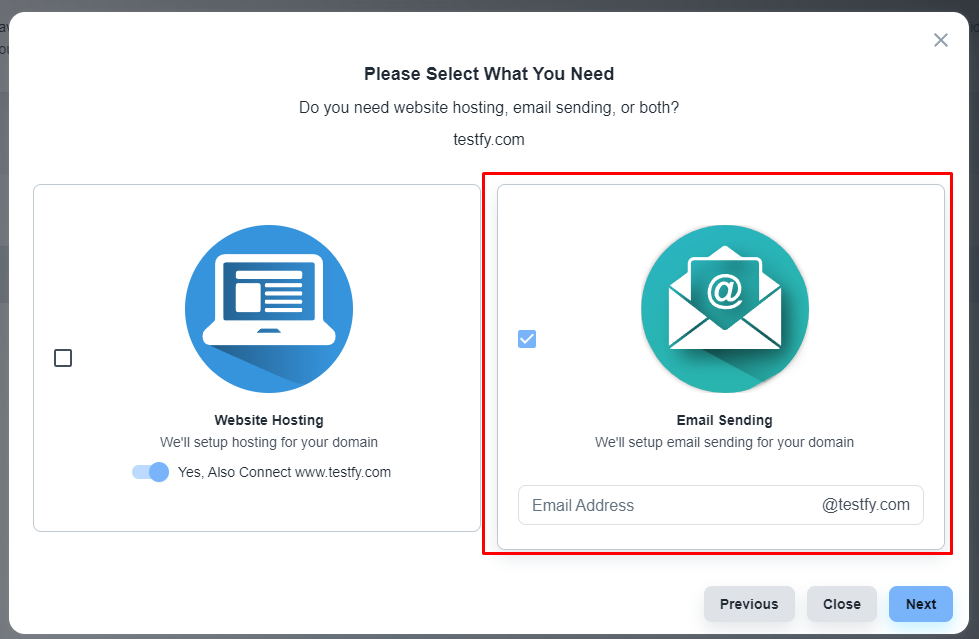
💡 Adding an email service with the System will not hamper your existing email services.
You can add your email address here, so the system automatically creates an inbox. This step is optional. You can do it later.
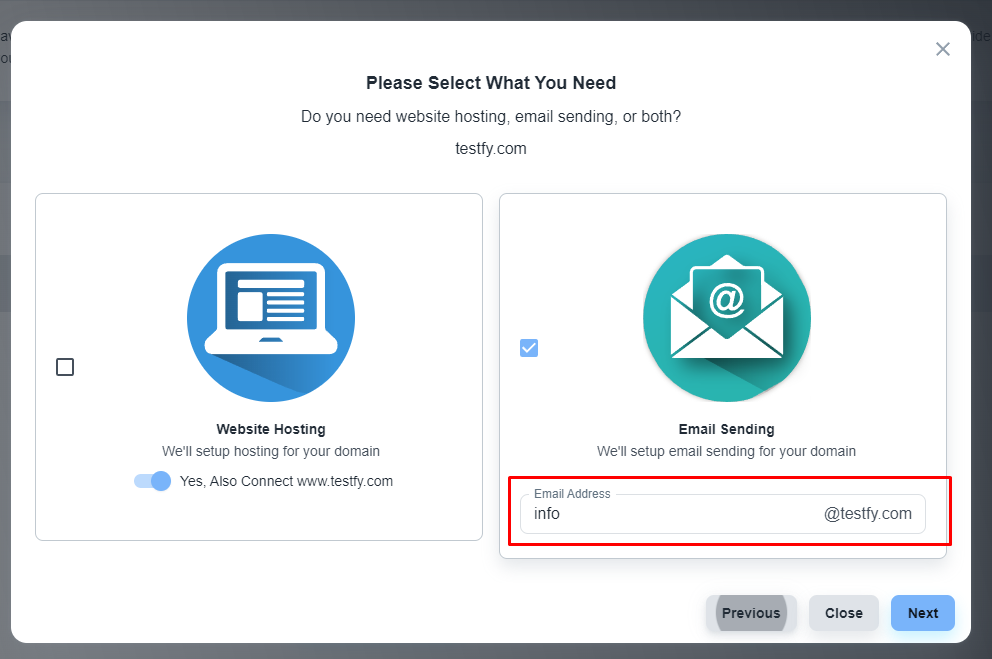
✅ Please don’t add your email address here to avoid any unwanted issues. After verifying the domain, you can connect your email address.
Please, click on the ‘Next’ button.
STEP 3: Choose faster CDN (optional)
Now, the system will offer you the option to choose a faster CDN for a better web service experience for your users. Please, click on the ‘No, Thank You’ button unless you want a faster CDN for $5/month.

STEP 4: Collect DNS records
Please, wait for a while. The system will provide you with the required DNS records you need to add to your domain registrar.
After adding all these DNS records to your domain manager, please wait a while for DNS propagation. It might take 24-48 hours.
Steps to Connect a Sub-Domain with System
STEP 1: Open the domain panel
Navigate to the domain panel by clicking the “Sites” on the left side menu. Then when you have that page open you will see a link to “Connected Domains” on the top of your page, please click that.

Now, click on the ‘Add Domain’ button to add your domain with System
STEP 2: Select domain type
The system will allow you to add a free domain or custom domain. For our case, we will select the second option, and put your domain name.
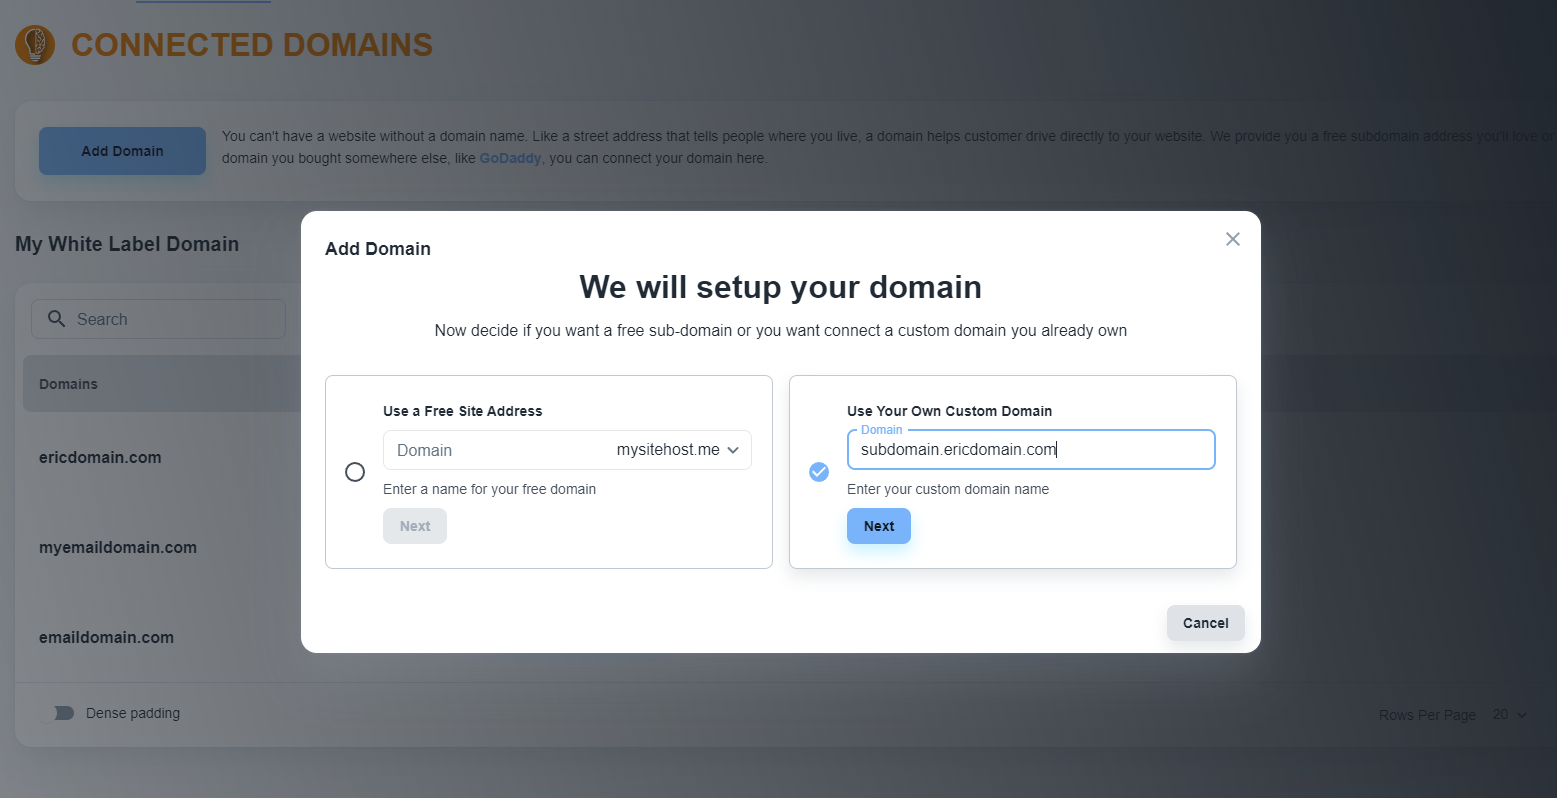
💡 Please, choose your subdomain like subdomain.ericdomain.com
Click on the ‘Next’ button.
STEP 3: Select services
Now, the system will offer you services. By default, the Website Hosting service will be enabled.
💡 When to use email sending? If you also need the Email service, please, click on the checkbox of the second tab, and add the email address that you want to add with System for email services.
</aside>

💡 Adding an email service will not hamper your existing email services.
Please, click on the ‘Next’ button.
STEP 4: Choose faster CDN (optional)
Now, the system will offer you the option to choose a faster CDN for a better web service experience for your users. Please, click on the ‘No, Thank You’ button unless you want a faster CDN for $5/month.
STEP 5: Collect DNS records
Please, wait for a while, the system will provide you with the required DNS records that you need to add to your domain registrar.
Separating DNS record
DNS record for Web Hosting
As per the screenshot, the first record is the DNS record for the web hosting service.
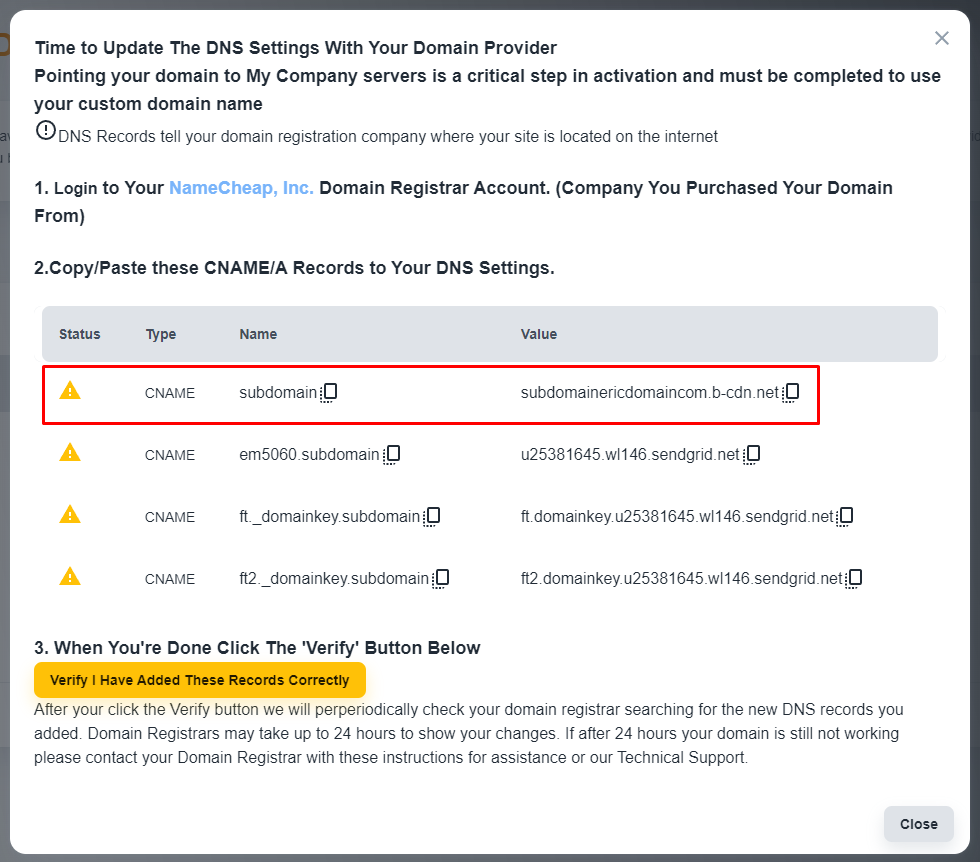
DNS record for Email Service
As per the screenshot, the last three records are related to the email services. All of these records are CNAME records.
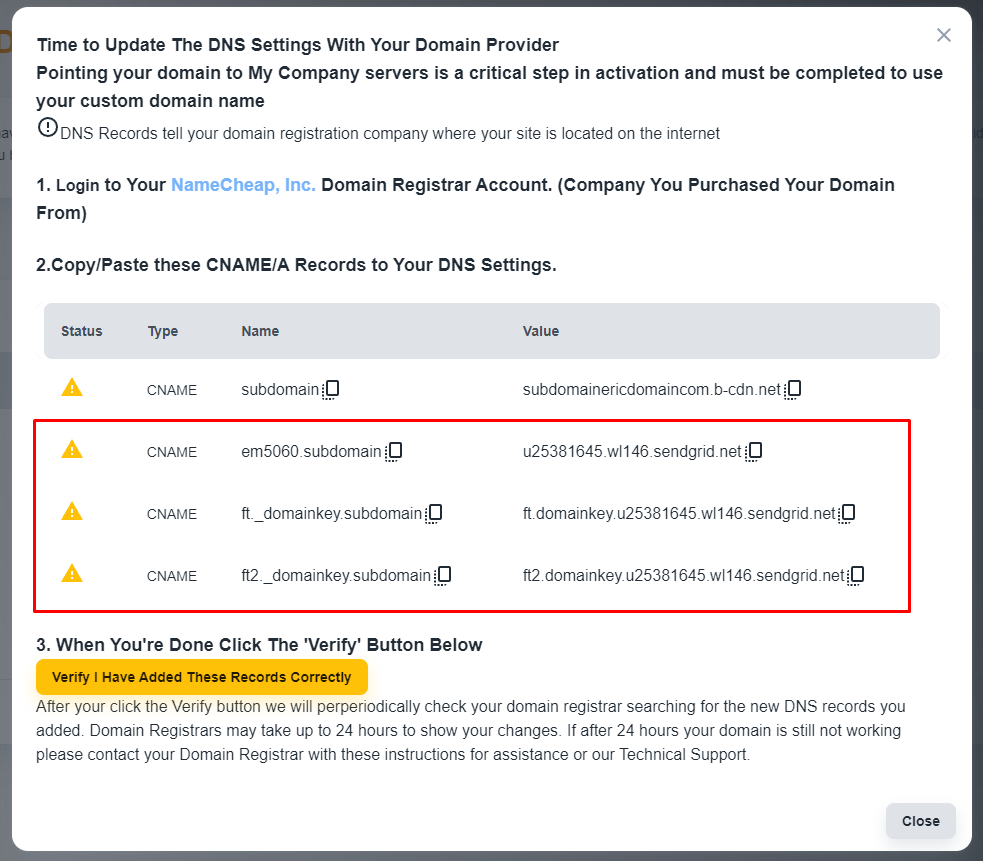
💡 If you need only one specific service, then you can ignore DNS records related to other services. Now, please add these DNS records to your domain manager.